

Halloween is the perfect time to unleash your inner mad scientist in the kitchen, and these Halloween Oreo Cookie Boo Brownies are the ultimate canvas for all that spooky creativity. Layers of fudgy brownie, a forest of Halloween Oreo cookies, a riot of fluffy marshmallows, and a crackling chocolate-Rice Krispies topping come together in a single pan to deliver a dessert that’s as thrilling to look at as it is to devour. Every bite is a symphony of textures—gooey chocolate, crisp cookies, pillowy marshmallow pockets, and that delightful snap of cereal clusters. Whether you’re prepping for a haunted house party, a kids’ costume contest, or a cozy movie night with just a hint of spookiness, these brownies are bound to steal the show.
What makes this recipe so approachable is how it balances convenience and creativity. You’ve got the ease of a boxed brownie mix (or your own tried-and-true recipe), the fun of unwrapping Halloween Oreos, and the satisfying ritual of stirring together marshmallows, chocolate chips, butter, and Rice Krispies. In roughly 20 minutes of prep, 30 minutes of baking, and about 45 minutes of cooling, you’ll have 24 servings (each about 350 calories) of a dessert that feels both decadent and delightfully festive. Don’t worry if you’re a beginner—this recipe is tailor-made for anyone who loves to bake but appreciates a little shortcut here and there. Ready to transform your kitchen into a Halloween laboratory? Let’s get started on those ghostly, gooey layers that everyone will be talking about.
KEY INGREDIENTS IN HALLOWEEN OREO COOKIE BOO BROWNIES
Before you dive into the mixing bowls and baking pan, let’s talk about the stars of this show. Each ingredient plays a crucial role in creating those luscious layers of flavor and texture that make these brownies unforgettable.
- Brownie mix
A convenient shortcut that guarantees a rich, fudgy foundation. Opt for a high-quality brand or your own homemade recipe to match your chocolate cravings. You can even choose a gluten-free mix if needed.
- Eggs, oil, and water
These simple components activate the brownie mix, binding it into a velvety batter and providing the moisture necessary for that signature, chewy consistency.
- Halloween Oreo cookies
Vanilla cream-filled chocolate cookies decked out in festive orange and black. They collapse into pockets of crunch and sweet cream, adding visual appeal and that classic Oreo flavor.
- Mini marshmallows
When sprinkled on hot brownies, these little clouds melt slightly, creating gooey peaks that beg to be pulled apart in each bite.
- Semi-sweet chocolate chips
Melted with butter, they form the glossy chocolate layer that holds the Rice Krispies together, offering a perfect balance of sweetness and depth.
- Unsalted butter
Combined with chocolate chips, it results in a smooth, creamy coating for the cereal, ensuring each crisp cluster is lushly coated.
- Rice Krispies cereal
Adds that satisfying, crackly texture on top. It contrasts beautifully with the soft brownie and marshmallow layers beneath.
- Orange food coloring (optional)
Just a few drops stirred into the marshmallow layer can amp up the Halloween vibes, turning those fluffy peaks into little bursts of festive color.
HOW TO MAKE HALLOWEEN OREO COOKIE BOO BROWNIES
Let’s walk through the process of building these spooky-delicious brownies layer by layer. Each step guides you toward a dessert that’s equal parts showstopper and comfort food.
1. Preheat your oven to 350°F (175°C), or follow the temperature on your brownie mix box. This ensures an even, consistent bake from edge to center.
2. Prepare the brownie mix exactly as directed on the package or in your homemade recipe, whisking together the eggs, oil, and water until the batter is smooth and glossy.
3. Line a 9×13-inch baking pan with parchment paper for easy removal, or generously grease it with butter or nonstick spray to prevent sticking.
4. Pour half of the brownie batter into the prepared pan, using a spatula to spread it into an even layer that reaches every corner.
5. Arrange a single layer of Halloween Oreo cookies on top of the batter, placing them side by side so the whole surface is covered like a creepy cookie blanket.
6. Spoon the remaining brownie batter over the Oreo layer, carefully smoothing it out to completely enclose the cookies while maintaining a uniform thickness.
7. Bake in the center of the preheated oven for 25–30 minutes, or until a toothpick inserted into the brownie portion (avoiding the Oreos) comes out with just a few moist crumbs clinging to it.
8. Remove from the oven and immediately sprinkle the mini marshmallows evenly over the hot surface, letting their heat melt the bottoms for that soft, sticky texture.
9. In a microwave-safe bowl, combine the semi-sweet chocolate chips and unsalted butter. Heat in 30-second intervals, stirring between bursts until you have a smooth, glossy chocolate sauce.
10. Stir the Rice Krispies cereal into the melted chocolate mixture until every flake is coated in that luscious, velvety chocolate butter blend.
11. Gently spread the chocolate-Rice Krispies mixture over the marshmallows using a spatula, taking care not to press down too hard—you want those marshmallow peaks to peek through for maximum spooky effect.
12. Allow the brownies to cool completely at room temperature before slicing into squares. For an extra festive flourish, you can add a few drops of orange food coloring to the marshmallow layer before topping with the cereal mixture, creating swirls of ghostly orange that set hearts racing.
SERVING SUGGESTIONS FOR HALLOWEEN OREO COOKIE BOO BROWNIES
When it comes time to unveil these Boo Brownies to your goblin crew or ghoulish guests, presentation is everything. The contrasting layers of dark brownie, speckled Oreo silhouettes, glowing marshmallows, and crackling chocolate clusters practically beg to be displayed on a platter dripping with Halloween charm. Serving them in a fun, interactive way elevates the entire experience, turning ordinary snack time into a hauntingly good celebration that everyone will talk about long after the last crumb is gone.
- Offer them warm and gooey, right after they’ve cooled enough to slice. The marshmallows will be soft and inviting, and guests can enjoy that perfect pull-apart effect when you plate each square.
- Create a “decorate-your-own” station by laying out bowls of extra crushed Oreos, Halloween sprinkles, and edible candy eyes. Allow friends and family to add their own spooky flair on top of each brownie.
- Serve alongside a glass of cold milk or a steaming mug of hot cocoa for the ultimate comfort combo. The creamy drink helps balance the sweet richness and brings out the chocolate notes.
- Arrange on a tiered cake stand or black lacquer tray with flickering tea lights for a dramatic, haunted vibe. Scatter plastic spiders or mini pumpkins around the edges to complete the eerie aesthetic.
HOW TO STORE HALLOWEEN OREO COOKIE BOO BROWNIES
Once your ghostly gallery of brownies has been admired (and hopefully partially devoured), you’ll want to keep the rest fresh and delicious for savoring later. Because these bars are multi-layered with marshmallows and cereal, proper storage is key to maintaining that ideal texture—no one wants sad, soggy Rice Krispies or dried-out brownies. Follow these simple tricks to ensure every bite stays just as magical as the first.
- Store at room temperature in an airtight container. If you’re eating them within 24 hours, this method keeps the brownie tender and the marshmallow peaks soft. Place a sheet of parchment between layers to prevent sticking.
- Refrigerate in a sealed container for up to 5 days. Chilling firms up the chocolate layer and makes slicing neater. Bring brownies to room temperature before serving to revive that melt-in-your-mouth feel.
- For longer storage, freeze individual squares on a baking sheet until solid, then transfer them to a freezer bag, removing as much air as possible. They’ll keep well for up to 3 months. Thaw overnight in the fridge or at room temperature.
- Avoid humid environments or direct sunlight, which can cause the marshmallows to weep and the Rice Krispies to lose their crunch. Always use fresh paper or plastic wrap to seal in moisture while keeping out excess air.
CONCLUSION
Bringing these Halloween Oreo Cookie Boo Brownies to life is like hosting a mini haunted house in your baking pan—a playful twist on classic flavors that’s guaranteed to delight ghosts of all ages. From the first swirl of brownie batter to the final crackle of the chocolate-cereal topping, you’ve orchestrated a symphony of tastes and textures that’s both fun to make and impossible to resist. With minimal prep time, simple ingredients, and beginner-friendly steps, this recipe invites bakers of any skill level to join in on the Halloween festivities. Don’t forget: you can easily customize these brownies by breaking extra Oreos on top for an even spookier look, swirling in peanut butter for a nutty surprise, or swapping in gluten-free ingredients to suit dietary needs.
Feel free to print this article and tuck it into your recipe binder or save it for next year’s celebrations—it’s destined to become a seasonal favorite. A handy FAQ section follows below, covering substitution ideas, troubleshooting tips, and answers to all those spooky questions that might pop up as you bake. If you give these Boo Brownies a try or have any questions along the way, I’d love to hear from you. Drop a comment, share your baking triumphs (or hilarious mishaps!), and let’s keep the conversation going. Happy haunting and even happier baking!
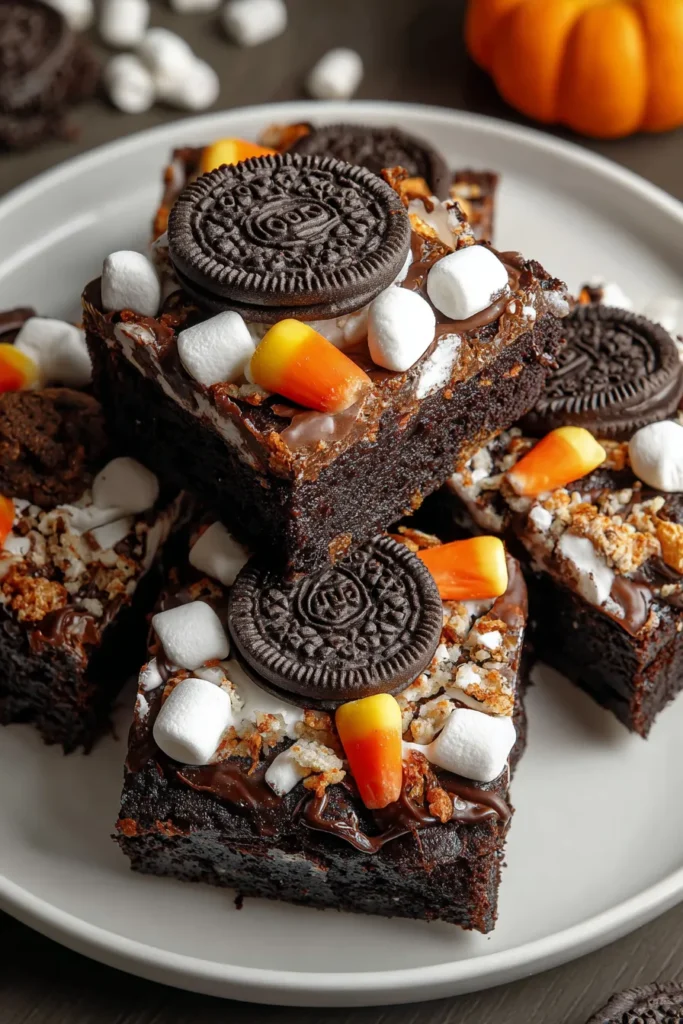

Halloween Oreo Cookie Boo Brownies
Description
These brownies combine rich chocolate with layers of Halloween Oreos and a sweet marshmallow topping, creating a festive dessert that's fun and delicious for any Halloween gathering.
Ingredients
Instructions
-
Preheat your oven to 350°F (175°C), or as directed by your brownie mix instructions.
-
Prepare the brownie mix according to the package instructions or your homemade recipe.
-
Line a 9x13 inch baking pan with parchment paper for easy removal, or grease the pan well.
-
Pour half of the brownie batter into the prepared pan and spread evenly.
-
Place a layer of Halloween Oreo cookies on top of the brownie batter, covering the entire surface.
-
Pour the remaining brownie batter over the Oreo cookies, spreading it evenly to cover the cookies completely.
-
Bake in the preheated oven for 25-30 minutes, or until a toothpick inserted into the brownie (but not an Oreo) comes out mostly clean.
-
Remove the brownies from the oven and sprinkle mini marshmallows over the top while still hot.
-
In a microwave-safe bowl, combine the chocolate chips and butter. Microwave in 30-second intervals, stirring in between, until completely melted and smooth.
-
Mix the Rice Krispies cereal into the melted chocolate and butter.
-
Gently spread the chocolate Rice Krispies mixture over the marshmallows using a spatula.
-
Allow the brownies to cool completely at room temperature before cutting into squares. For a festive appearance, you can add a few drops of orange food coloring to the marshmallow layer before topping with the cereal mixture.
Note
- For an extra spooky look, break some Oreos on top of the chocolate Rice Krispies layer before it sets.
- If you're a fan of peanut butter, swirl in some peanut butter into the brownie batter before baking.
- Cortical restriction: keep brownies forked to allow the marshmallow layer to peek through for a spooky touch.
- Perfect to serve at Halloween parties, these brownies can also be made gluten-free if you use gluten-free brownie mix and cookies.

