

Sticky Honey Garlic Cauliflower delivers a delightful twist on veggies, featuring crunchy cauliflower florets baked to golden perfection and drenched in a glossy, sweet-savory honey garlic sauce with a hint of sesame. This simple yet irresistible dish elevates weeknight dinners or makes a show-stopping appetizer that’s both vegetarian-friendly and crowd-pleasing. With just a handful of pantry staples, you’ll have a flavorful side or main that’s easy to master and impossible to resist.
Key Ingredients
Ready to whip up this irresistible cauliflower? Here’s what you need and why each element matters:
- 1 head cauliflower: Crunchy florets that soak up every bit of sticky sauce.
- 2 tbsp olive oil: Provides a light coating for crisp baking.
- 1 tbsp cornstarch: Creates a crispy crust on each floret.
- 3 cloves garlic: Adds pungent, savory depth to the sauce.
- 3 tbsp soy sauce: Brings umami and saltiness to balance the honey.
- 4 tbsp honey: Sweet backbone that clings in a glossy glaze.
- 1 tbsp rice vinegar: Cuts through sweetness with bright acidity.
- 1 tsp sesame oil: Imparts a toasty, nutty finish.
- 2 tbsp water: Loosens the sauce for even coating.
- 1 tsp sesame seeds: Adds a delicate crunch and visual appeal.
- 2 green onions: Fresh, mild bite to garnish and elevate flavor.
- Salt to taste: Enhances overall seasoning.
- Pepper to taste: Provides a subtle, warming kick.
How To Make Sticky Honey Garlic Cauliflower
With these ingredients on hand, transforming cauliflower into a sticky, flavorful masterpiece is straightforward. You’ll start by baking the florets until they’re light and crisp, then whip up the sauce on the stovetop before tossing everything together so each piece is evenly coated in that signature honey garlic glaze.
1. Preheat the oven to 425°F and line a baking sheet with parchment paper to prevent sticking.
2. Cut the cauliflower into bite-sized florets and place them in a large bowl, ensuring uniform pieces for even cooking.
3. Add olive oil, cornstarch, salt, and pepper to the bowl and toss until each floret is evenly coated in a thin, crispy-forming layer.
4. Spread the cauliflower on the prepared baking sheet in a single layer and bake for 20–25 minutes, turning halfway through, until golden and crispy on all sides.
5. Meanwhile, mince the garlic and whisk together garlic, soy sauce, honey, rice vinegar, sesame oil, and water in a small bowl until smooth.
6. Heat a large skillet over medium heat and pour in the sauce mixture. Simmer for 2–3 minutes, stirring constantly, until the sauce thickens into a glossy, clingy glaze.
7. Add the baked cauliflower to the skillet and toss gently until every piece is coated with the sticky sauce, ensuring no floret goes unglazed.
8. Transfer to a serving platter and sprinkle with sesame seeds and sliced green onions for a burst of fresh crunch and color.
Serving Suggestions
Whether you’re hosting guests or enjoying a cozy dinner at home, these ideas will elevate your Sticky Honey Garlic Cauliflower to new heights:
- Pair with steamed jasmine rice to soak up every drop of that luscious sauce and balance the sweetness with fluffy grains.
- Serve atop a bed of mixed greens for a light, vegetarian-friendly meal that adds extra texture and freshness.
- Garnish with a handful of crispy wonton strips or crushed peanuts for an unexpected crunch and hint of richness.
- Accompany with a side of pickled vegetables like carrots and cucumbers to cut through the sweetness with tangy contrast.
Tips For Perfect Sticky Honey Garlic Cauliflower
Nailing the perfect balance between sweet glaze and crispy bite is easier than you think—here are a few pro tips:
- For a spicier kick, add a pinch of red pepper flakes to the sauce for warm heat that complements the honey’s sweetness.
- This recipe works well in an air fryer at 400°F for 15 minutes, shaking halfway to ensure even crispiness without additional oil.
- Leftovers can be stored in an airtight container in the fridge for up to 3 days—reheat gently to maintain texture.
- Serve with steamed rice or over a bed of greens for a complete meal that’s both satisfying and nutrient-packed.
How To Store It
Proper storage preserves flavor and texture so you can enjoy leftovers just as much as fresh-made cauliflower. Keep these tips in mind:
- Airtight container: Store any uneaten cauliflower in a sealed container in the refrigerator for up to 3 days to keep it fresh.
Frequently Asked Questions
Curious cooks often have questions—here are the answers to help you master this recipe:
- Q: How long does it take to prepare this recipe from start to finish?
A: From start to finish it takes about 35–40 minutes. This includes 5–10 minutes to wash, chop, and coat the cauliflower, 20–25 minutes to bake until golden and crispy, and 2–3 minutes to simmer the sauce and toss the florets, plus any time to preheat the oven.
- Q: How can I ensure the cauliflower is crispy when baked?
A: To achieve maximum crispiness, make sure each floret is evenly coated in olive oil and cornstarch, spread them in a single layer without crowding on the parchment-lined sheet, and turn them halfway through baking. Preheating the oven to a full 425°F and using parchment paper helps remove excess moisture and promotes browning.
- Q: Can I use an air fryer instead of the oven?
A: Yes, you can air fry the cauliflower at 400°F for about 15 minutes, shaking the basket halfway through. Coat the florets the same way with olive oil, cornstarch, salt, and pepper, then proceed with the sauce in step six as you would after baking.
- Q: What are some substitutions or additions to customize the flavor?
A: For a spicier kick, stir in a pinch of red pepper flakes or sriracha when whisking the sauce. To reduce sweetness, cut back on honey or use half honey and half maple syrup. You can swap soy sauce for tamari to make it gluten-free, or add a tablespoon of hoisin sauce for richer umami.
- Q: How should I store and reheat leftovers?
A: Store leftovers in an airtight container in the refrigerator for up to 3 days. Reheat in a 375°F oven or air fryer for 5–7 minutes to restore crispiness, or microwave for 1–2 minutes on medium, then briefly crisp under the broiler or in a hot skillet if desired.
- Q: Is this recipe suitable for gluten-free diets?
A: To make it gluten-free, replace regular soy sauce with gluten-free tamari or coconut aminos. All other ingredients—cauliflower, cornstarch, honey, rice vinegar, sesame oil, garlic—are naturally gluten-free, so no other changes are needed.
- Q: What side dishes pair well with Sticky Honey Garlic Cauliflower?
A: This cauliflower is perfect served over steamed jasmine or brown rice, alongside quinoa or cauliflower rice, or on a bed of fresh greens. It also makes a flavorful taco filling, a topping for noodle bowls, or a shareable appetizer with extra sesame seeds and sliced green onions on the side.
What Makes This Special
What really sets this Sticky Honey Garlic Cauliflower apart is its perfect contrast between crisp, oven-baked florets and a luscious, glossy sauce that’s both sweet and savory with a whisper of sesame. It’s a fun, fuss-free recipe for beginners yet impressive enough for dinner guests. Feel free to print and stash this article in your recipe box—you'll want to make it again. If you try it, drop a comment below or ask any questions; I’d love to hear how it turns out!
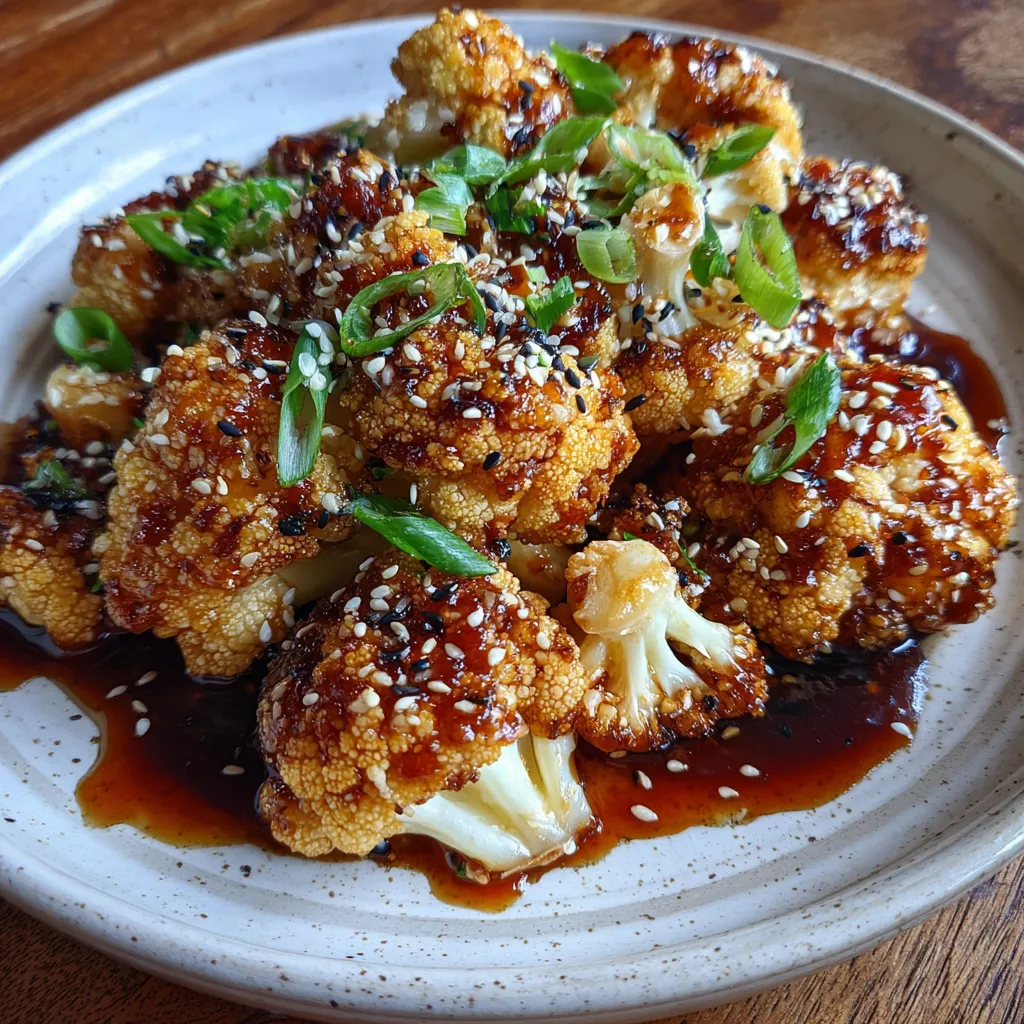

Sticky Honey Garlic Cauliflower
Description
Golden florets dusted in cornstarch crisp up in the oven, then get coated in a sticky glaze of honey, soy, and garlic. Each bite crackles with crunch before melting into sweet, savory goodness with sesame notes.
Ingredients
Instructions
-
Preheat the oven to 425°F and line a baking sheet with parchment paper.
-
Cut the cauliflower into bite-sized florets and place them in a large bowl.
-
Add olive oil, cornstarch, salt, and pepper to the bowl and toss until each floret is evenly coated.
-
Spread the cauliflower on the prepared baking sheet in a single layer and bake for 20–25 minutes, turning halfway through, until golden and crispy.
-
Meanwhile, mince the garlic and whisk together garlic, soy sauce, honey, rice vinegar, sesame oil, and water in a small bowl.
-
Heat a large skillet over medium heat and pour in the sauce mixture. Simmer for 2–3 minutes, stirring constantly, until the sauce thickens and becomes glossy.
-
Add the baked cauliflower to the skillet and toss gently until every piece is coated with the sticky sauce.
-
Transfer to a serving platter and sprinkle with sesame seeds and sliced green onions.
Note
- For a spicier kick, add a pinch of red pepper flakes to the sauce.
- This recipe works well in an air fryer at 400°F for 15 minutes, shaking halfway.
- Leftovers can be stored in an airtight container in the fridge for up to 3 days.
- Serve with steamed rice or over a bed of greens for a complete meal.

