

There’s nothing more delightful than sinking your teeth into a devilishly rich chocolate cupcake crowned with a little marshmallow ghost. The deep, bittersweet cocoa in the cake contrasts beautifully with that pillowy, sweet marshmallow, creating a flavor mashup that feels like a cozy campfire meets spook-tacular Halloween party. When you take that first bite, you’ll notice the cake’s tender crumb giving way to tiny bursts of moisture, thanks to the gentle addition of boiling water in the batter. And then, as you bite through the lightly toasted marshmallow top, your taste buds will dance between the smokiness from the torch and the gentle sweetness that marries so well with the dark chocolate base. Trust me, you’ll find yourself grinning at how such simple ingredients can turn into a dessert that’s not just yummy, but downright enchanting.
I still remember the first time I made these Spooky Chocolate Ghost Cupcakes for my family. My niece was wide-eyed as I toasted each marshmallow ghost, and my nephew insisted on helping insert the chocolate chip eyes—even though he made more of a sticky mess than actual ghosts! We spent the afternoon giggling over our slightly lopsided marshmallow specters, and by the time we’d all had seconds (or thirds), the kitchen looked like a sugar battlefield. These treats are as much about the memories you make while baking as they are about the final product. Whether you’re hosting a haunted house party, doing a fun fall activity with the kids, or simply craving a chocolatey pick-me-up, these cupcakes bring out the kid in everyone and will have you coming back to the recipe year after year.
KEY INGREDIENTS IN SPOOKY CHOCOLATE GHOST CUPCAKES
Before we dive into the spooky yet scrumptious magic, let’s chat about the stars of the show. Each ingredient plays a crucial role in making these cupcakes moist, flavorful, and ghost-worthy. Here’s what you’ll need and why they’re so important:
- All-purpose flour
Provides the structure and delicate crumb of the cupcake. It’s the foundation that holds everything together while keeping it light enough to rise beautifully.
- Granulated sugar
Sweetens the batter and helps create a tender crumb. It also assists with achieving a slightly crisp top that gives way to moist cake underneath.
- Unsweetened cocoa powder
Delivers that rich, deep chocolate flavor. Opt for a higher-quality cocoa for an extra intense chocolate hit.
- Baking powder
Acts as a leavening agent that helps lift the batter so your cupcakes rise evenly and stay fluffy.
- Baking soda
Boosts rise and balances the acidic cocoa, contributing to both texture and flavor.
- Salt
Enhances all the other flavors, cutting through the sweetness and making the chocolate pop.
- Whole milk
Adds moisture and richness, ensuring a tender crumb and balanced flavor.
- Vegetable oil
Keeps the cupcakes ultra-moist and incredibly soft. Oil beats butter here for a consistently tender texture.
- Large egg
Binds the ingredients and provides structure. It also contributes to that lovely, cake-like crumb.
- Vanilla extract
Rounds out flavors with a subtle sweetness and aromatic depth, making each bite feel homey and comforting.
- Boiling water
Intensifies the cocoa flavor and ensures a super-smooth, pourable batter for even baking.
- Large marshmallows
Become the adorable ghostly toppers when gently toasted. They add sweetness, fun, and that iconic Halloween vibe.
- Mini chocolate chips
Transform plain marshmallows into spooky ghosts with two tiny eyes—instant cuteness overload!
HOW TO MAKE SPOOKY CHOCOLATE GHOST CUPCAKES
Let’s roll up our sleeves and get baking! This recipe is beginner-friendly, but the results look like you’ve spent hours in the kitchen. Follow these clear and detailed steps, and soon you’ll have a dozen eerie-sistible treats ready to haunt your taste buds.
1. Preheat and prepare
Preheat your oven to 350°F (175°C). While it’s warming up, line a 12-cup muffin tin with cupcake liners. This keeps your cupcakes from sticking and makes clean-up a breeze.
2. Combine dry ingredients
In a large bowl, whisk together the flour, sugar, cocoa powder, baking powder, baking soda, and salt until evenly mixed. This ensures a uniform rise and consistent chocolate flavor in every bite.
3. Add wet ingredients
Pour in the milk, vegetable oil, egg, and vanilla extract. Use a spatula or electric mixer on low speed to mix until the batter is smooth and well combined—no streaks of flour remaining.
4. Incorporate boiling water
Carefully pour in the boiling water and stir slowly. The batter will be thin, but that’s exactly what we want for a moist, tender crumb and intensified cocoa flavor.
5. Fill cupcake liners
Divide the thin batter evenly among the prepared muffin cups, filling each about 2/3 full. This gives the cupcakes room to rise without spilling over.
6. Bake to perfection
Bake for 18–20 minutes, or until a toothpick inserted into the center comes out clean or with just a few moist crumbs attached. The tops should spring back lightly when touched.
7. Cool the cupcakes
Remove the pan from the oven and let the cupcakes rest in the pan for 5 minutes. This brief cooling period helps them set. Then, transfer each cupcake to a wire rack to cool completely.
8. Add marshmallow ghosts
Place one large marshmallow on top of each cooled cupcake. Using a kitchen torch, gently toast the marshmallow surface until it’s lightly browned and puffy. Move the flame in a circular motion to avoid burning any single spot.
9. Create ghostly eyes
While the marshmallow is still soft, insert two mini chocolate chips to form each ghost’s eyes. Press them in gently so they stick.
10. Serve and enjoy
Arrange your spooky chocolate ghost cupcakes on a platter and watch the delighted reactions as guests bite into these hauntingly delicious treats!
SERVING SUGGESTIONS FOR SPOOKY CHOCOLATE GHOST CUPCAKES
These cupcakes are perfect on their own, but why stop at the basics? With a few simple touches, you can elevate the spooky factor and delight your guests even more. Whether you’re hosting a full-blown Halloween bash or a cozy family gathering, these serving ideas will make your table the talk of the night.
- Festive platter arrangement
Serve the cupcakes on a dark-themed cake stand or tray lined with crinkled black tissue paper. Add edible plastic spiders or candy eyeballs around the base for an extra creepy touch.
- Ghostly milk shots
Pair each cupcake with a mini glass of cold milk sprinkled with a little black sanding sugar on the rim. The sugar creates a spooky effect while enhancing the classic cupcake-and-milk combo.
- Haunted display labels
Create small tent cards with fun names like “Witch’s Brew” or “Phantom Delight.” Place them in front of each row of cupcakes to guide guests through your dessert table with a playful storyline.
- Ghoulish garnish station
Set out small bowls of colored sprinkles, chocolate syrup, and candy bones so guests can add their own eerie decorations. It turns dessert time into an interactive, memorable activity.
HOW TO STORE SPOOKY CHOCOLATE GHOST CUPCAKES
Keeping your ghostly treats fresh is key to preserving their texture and flavor. Since marshmallows can soften and chocolate chips may lose a bit of their snap, follow these storage tips to enjoy your cupcakes at their best for days to come.
- Room temperature with airtight cover
Store cupcakes in a single layer in an airtight container at room temperature for up to 2 days. Separate layers with parchment paper to prevent ghosts from sticking.
- Refrigeration for longer life
If you need to keep them fresh for 3–4 days, place the cupcakes in an airtight container and refrigerate. Bring them back to room temperature for about 30 minutes before serving to restore their softness.
- Freeze for future spooks
To freeze, place cooled cupcakes (without marshmallows) in a single layer on a baking sheet for 1–2 hours, then transfer to a freezer-safe container with parchment layers. Freeze up to 1 month. Thaw in the refrigerator overnight, then top with fresh marshmallows and mini chips.
- Reviving texture
If the marshmallows lose a bit of their toasted crispness, pop the cupcakes under a broiler for 5–10 seconds or use your kitchen torch to refresh that golden brown finish right before serving.
CONCLUSION
Baking these Spooky Chocolate Ghost Cupcakes is a delightful way to infuse your Halloween celebrations with both fun and fantastic flavor. From the moment you whisk together the dry ingredients—flour, sugar, cocoa, and leaveners—you’re setting the stage for cupcakes that sparkle with sweet cocoa richness. Adding whole milk, oil, and an egg ensures these treats stay irresistibly moist, while the splash of vanilla introduces a comforting warmth. Stirring in boiling water intensifies the chocolate experience, transforming each cupcake bite into a symphony of deep, café-worthy chocolate. Topping everything with toasted marshmallow ghosts and chocolate chip eyes? That’s pure kitchen theatre that delights kids and adults alike. When you invite friends or family to gather around, offering cold milk and spooky decorations, you’re not just serving cupcakes; you’re creating memories that linger long after the last ghost has been nibbled away.
Feel free to print this article or save it for your next baking adventure—your future self will thank you when Halloween rolls around again! If any questions pop up while you’re whisking, mixing, or torching, you can always refer back to the FAQ section below for quick answers. And of course, I’d love to hear how your cupcakes turned out: Did your marshmallow ghosts toast to perfection? Did the chocolate chips stand up as spooky eyes? Drop your comments, suggestions, or even fun pictures in the comments if you try this recipe. Happy baking, and may your Halloween table be as hauntingly delicious as these ghostly cupcakes!
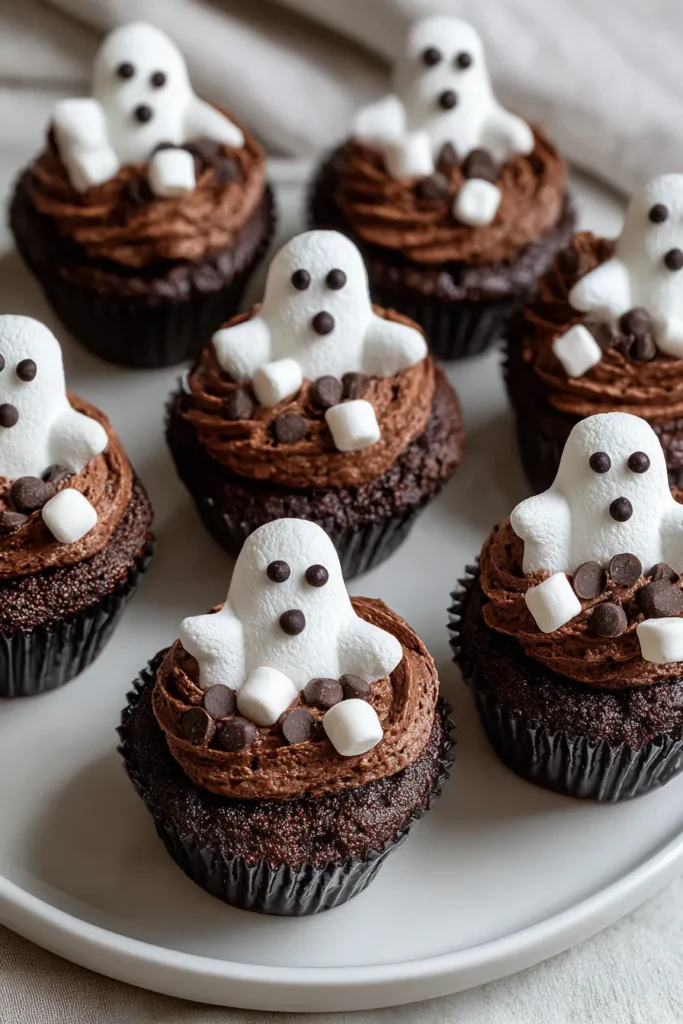

Spooky Chocolate Ghost Cupcakes
Description
These decadent chocolate cupcakes are topped with toasted marshmallows, transforming them into adorable ghostly figures. A treat that's as fun to make as it is to eat!
Ingredients
Instructions
-
Preheat your oven to 350°F (175°C) and line a 12-cup muffin tin with cupcake liners.
-
In a large bowl, whisk together the flour, sugar, cocoa powder, baking powder, baking soda, and salt.
-
Add milk, vegetable oil, egg, and vanilla extract into the dry ingredients. Mix until well combined.
-
Carefully stir in the boiling water until the batter is smooth. The batter will be thin.
-
Pour the batter evenly into the prepared muffin cups, filling each about 2/3 full.
-
Bake for 18-20 minutes, or until a toothpick inserted into the center comes out clean.
-
Remove from the oven and let the cupcakes cool in the pan for 5 minutes. Then transfer them to a wire rack to cool completely.
-
Once cooled, place a marshmallow on top of each cupcake. Using a kitchen torch, gently toast the marshmallow until lightly browned.
-
Insert two mini chocolate chips into each marshmallow to form the ghost’s eyes.
-
Serve the cupcakes and enjoy the spooky effect of the ghostly marshmallows.
Note
- For a rich cocoa flavor, consider using high-quality cocoa powder.
- Make sure the cupcakes are completely cool before adding the marshmallow ghosts to prevent melting.
- For extra spookiness, you can add food coloring to the marshmallows.
- These cupcakes are perfect for Halloween parties and kids' events.
- Consider pairing them with a glass of cold milk for the best taste experience.

