

When the velvety tang of cheesecake meets the lush, cocoa-kissed soul of red velvet cake, something magical happens. This Red Velvet Oreo Cheesecake is not just another dessert—it’s a showstopper that turns any gathering into an unforgettable experience. Each forkful delivers a symphony of textures: the crisp chocolate crunch of an Oreo cookie crust, the silky smoothness of a cream cheese filling, and the light, airy sweetness of whipped topping. There’s an undeniable thrill in seeing that deep ruby-red cheesecake center peeking through layers of Oreo crumbs and fluffy whipped cream. You can practically feel the festive spirit that this dessert brings to the table, perfect for birthdays, holidays, or simply to celebrate a Tuesday afternoon that deserves a little extra indulgence.
Every step in crafting this cheesecake—from crushing those iconic cookies to gently folding in the eggs—invites you to slow down, savor the process, and appreciate how simple ingredients can transform into a masterpiece. I can’t help but grin when I think about how this cheesecake wows my friends at parties: the moment they cut the first slice, eyes widen and hands reach for a second piece before the first is even finished. It’s more than a recipe; it’s a culinary hug that says, “I care enough to make something truly special.” So grab your springform pan, gather your icing bag of red food coloring, and get ready to create a dessert legacy that people will talk about long after the last crumb is gone.
KEY INGREDIENTS IN RED VELVET OREO CHEESECAKE
Every great dessert starts with a lineup of quality ingredients that each play a starring role in building layers of flavor and texture. For our Red Velvet Oreo Cheesecake, we’re combining classic cheesecake components with festive red velvet flair and the unmistakable crunch of Oreos. Here’s what you’ll need to round up before you begin:
- Oreo cookies
Rich chocolate sandwich cookies crushed into fine crumbs to form a sturdy, flavor-packed crust that contrasts beautifully with the creamy filling.
- Unsalted butter
Melted to bind the Oreo crumbs, giving the crust just the right level of firmness so it holds together with a tender, buttery mouthfeel.
- Cream cheese
The superstar of any cheesecake, soft and creamy, it provides the tangy base that feels indulgent yet balanced once combined with other ingredients.
- Granulated sugar
Sweetens the cream cheese filling, helping to smooth out the tang and contribute to that silky texture we all love.
- Vanilla extract
Adds aromatic warmth and depth, rounding out the dairy flavors and enhancing the sweet notes in every bite.
- Sour cream
Infuses a subtle tang and extra moisture, creating a luxuriously smooth filling that prevents any dry edges.
- All-purpose flour
A small addition that gives structure and stability, helping the cheesecake set perfectly without cracking.
- Cocoa powder
Brings a whisper of chocolate earthiness to support the red velvet profile without overwhelming the creamy layers.
- Red food coloring
The secret to that iconic red velvet hue, ensuring your cheesecake looks as stunning as it tastes.
- Eggs
Provide structure and richness, binding all the filling ingredients together as they bake into a luscious custard.
- Heavy cream
Whipped into soft peaks, it transforms into a light, billowy topping that adds an elegant finish.
- Powdered sugar
Sweetens the whipped cream topping without graininess, delivering a glossy, dreamy cap on your chilled cheesecake.
HOW TO MAKE RED VELVET OREO CHEESECAKE
Before diving into the detailed steps, let’s talk about the overall process: we’re building a textured Oreo crust, crafting a vibrant red velvet-infused cheesecake batter, and finishing it off with a cloud-like whipped cream topping. This method ensures each layer bakes to perfection, setting just enough to slice cleanly while retaining that signature cheesecake jiggle.
1. Preheat the oven to 325°F (162°C).
Position the oven rack in the center, then allow the temperature to stabilize. Proper preheating ensures even baking so your cheesecake sets without overcooking at the edges.
2. Combine the crushed Oreo cookies and melted butter in a bowl until the mixture resembles wet sand. Press the mixture firmly into the bottom of a 9-inch springform pan to form the crust. Set aside.
Firmly packing the crumbs guarantees a sturdy base that holds its shape when you slice.
3. In a large mixing bowl, beat the cream cheese until smooth and fluffy. Gradually add the granulated sugar and mix until blended.
Use an electric mixer on medium speed—this lufts air into the cheese for a silky texture.
4. Add the vanilla extract, sour cream, flour, cocoa powder, and red food coloring, and mix until well combined.
Scrape down the sides of the bowl to ensure no pockets of unmixed ingredients remain.
5. Incorporate the eggs one at a time, beating briefly after each addition until the mixture is smooth. Be careful not to overbeat.
Gentle mixing keeps the batter aerated without creating large air bubbles that can cause cracks.
6. Pour the cream cheese batter over the prepared crust in the springform pan.
Smooth the top with an offset spatula for an even finish.
7. Place the springform pan on a baking sheet and bake in the preheated oven for 60–70 minutes, or until the center is set but still slightly jiggly.
The baking sheet catches any drips and helps distribute heat evenly.
8. Turn the oven off and crack the door open slightly. Allow the cheesecake to cool in the oven for 1 hour.
This gradual temperature drop reduces the risk of cracks by letting the filling settle gently.
9. Remove the cheesecake from the oven and chill in the refrigerator for at least 4 hours, or overnight for best results.
Full chilling time ensures the flavors meld and the texture firms up for clean slicing.
10. Before serving, whip the heavy cream with the powdered sugar until soft peaks form. Spread the whipped cream over the chilled cheesecake and garnish with additional Oreo crumbs, if desired.
A final dusting of crumb garnish brings the look and flavor full circle.
SERVING SUGGESTIONS FOR RED VELVET OREO CHEESECAKE
Once your Red Velvet Oreo Cheesecake has had time to chill and set, serving it becomes a delightful event in itself. You’ll want to highlight its dramatic color contrast and layers of flavor, turning each slice into a little work of edible art. Whether you’re presenting it as a festive centerpiece or treating loved ones to an intimate dessert finale, these ideas will help you plate it to perfection.
- Garnish with fresh berries: Arrange a few raspberries or strawberries around each slice to add a pop of natural color and a bright, fruity contrast that complements the richness of the cheesecake.
- Create an Oreo crumb rim: Dip the edges of each slice lightly into extra crushed Oreo crumbs for a polished, bakery-style presentation that doubles down on the chocolate crunch.
- Serve with a drizzle of chocolate sauce: Warm a silky chocolate ganache or simple syrup drizzle on the plate before setting the cheesecake slice on top—this adds an elegant, glossy finish and an extra layer of indulgence.
- Pair with sparkling wine or coffee: Offer a glass of bubbly Prosecco for celebratory occasions or a freshly brewed espresso for a cozy, after-dinner treat; the tang of the cheesecake balances beautifully with both.
HOW TO STORE RED VELVET OREO CHEESECAKE
Proper storage is essential to preserve this cheesecake’s creamy texture and vibrant color. Whether you need to prepare it a day in advance or save leftovers for later enjoyment, these methods will help maintain flavor and quality, ensuring every slice stays as decadent as the first.
- Refrigerate in the springform pan: After the initial chilling period, cover the pan tightly with plastic wrap or aluminum foil. Keep it on a flat shelf to prevent any shifting. Properly wrapped, it will stay fresh for up to five days.
- Use an airtight container: If you’ve removed the cake from its pan, place individual slices in a sealed container, layering parchment paper between them to avoid sticking. Store in the back of the refrigerator for consistent cool temperatures.
- Freeze for longer storage: For up to two months, freeze well-wrapped slices. First, wrap each piece in plastic wrap, then enclose in a layer of aluminum foil. Label with the date to track freshness.
- Thaw with care: When ready to enjoy, transfer frozen slices to the refrigerator and let them thaw overnight. This gradual approach prevents condensation from watering down the topping and ensures the texture remains smooth.
CONCLUSION
This Red Velvet Oreo Cheesecake has been our journey from the moment we talked about velvety cream cheese and crushed cookies to the very last decadent bite of whipped cream-topped perfection. You’ve seen how the simple act of pressing Oreo crumbs into a pan can set the stage for a vibrant red filling bursting with tang and richness. We’ve walked through each ingredient’s role, guided you step by step through baking techniques that prevent cracks and ensure a silky center, and even shared ways to store and serve your masterpiece. With a total prep time of around 30 minutes, one hour of bake time, and at least four hours of rest time (overnight chilling is even better!), this intermediate-level recipe is perfect for home bakers aiming to impress. Calories sit at around 450 per generous slice—an indulgence worth every mouthwatering forkful. Feel free to print and save this article for future celebrations, and know that just below you’ll find a handy FAQ to address any questions that might pop up as you create your own cheesecake legend.
I’d love to hear how your Red Velvet Oreo Cheesecake adventure turns out! Did your crust come out perfectly crisp? Did the whipped cream topple on smoothly? Leave a comment sharing your tips or questions. If you hit a snag or discover a new twist—perhaps a swirl pattern or a unique garnish—please let me know. Your feedback helps build a community of passionate home bakers who support each other in crafting unforgettable desserts. Whether you’re a cheesecake veteran or testing these waters for the first time, I’m here to help, cheer you on, and celebrate every delicious success. Happy baking!
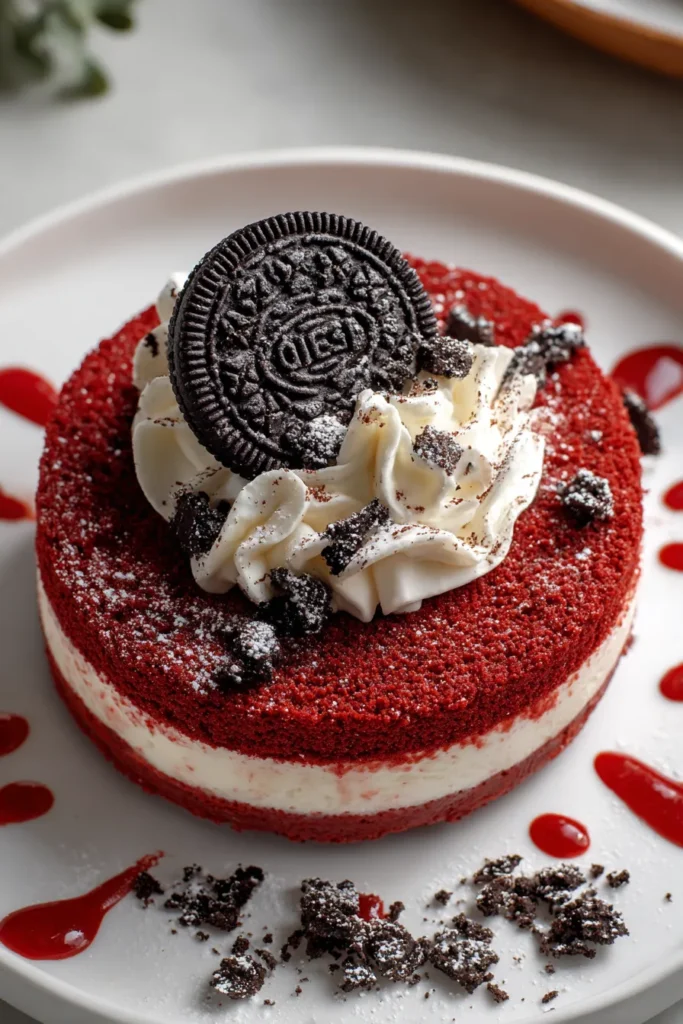

Red Velvet Oreo Cheesecake
Description
This Red Velvet Oreo Cheesecake combines the tangy creaminess of cheesecake with the iconic flavors of red velvet and chocolatey Oreos, creating a stunning dessert that's perfect for any occasion.
Ingredients
Instructions
-
Preheat the oven to 325°F (162°C).
-
Combine the crushed Oreo cookies and melted butter in a bowl until the mixture resembles wet sand. Press the mixture firmly into the bottom of a 9-inch springform pan to form the crust. Set aside.
-
In a large mixing bowl, beat the cream cheese until smooth and fluffy. Gradually add the granulated sugar and mix until blended.
-
Add the vanilla extract, sour cream, flour, cocoa powder, and red food coloring, and mix until well combined.
-
Incorporate the eggs one at a time, beating briefly after each addition until the mixture is smooth. Be careful not to overbeat.
-
Pour the cream cheese batter over the prepared crust in the springform pan.
-
Place the springform pan on a baking sheet and bake in the preheated oven for 60-70 minutes, or until the center is set but still slightly jiggly.
-
Turn the oven off and crack the door open slightly. Allow the cheesecake to cool in the oven for 1 hour.
-
Remove the cheesecake from the oven and chill in the refrigerator for at least 4 hours, or overnight for best results.
-
Before serving, whip the heavy cream with the powdered sugar until soft peaks form. Spread the whipped cream over the chilled cheesecake and garnish with additional Oreo crumbs, if desired.
Note
- For a perfect red velvet color, adjust the amount of red food coloring as needed.
- This cheesecake is excellent for holiday gatherings due to its festive color and rich flavor.
- Ensure the cream cheese is fully softened for a smooth cheesecake mixture.
- Always use a springform pan for easy removal of the cheesecake after chilling.

