

There’s something undeniably cozy about tucking into a slice of Pumpkin Dump Cake on a crisp autumn evening. This easy dessert brings all the flavors of fall together in one simple dish, blending silky pumpkin puree, warming pumpkin pie spice, and a buttery cake topping that turns golden as it bakes. With just a few pantry staples and minimal prep—about 15 minutes of hands-on time—you’ll have a show-stopping dessert that feels like a hug in every bite. Whether you’re hosting a holiday gathering or craving a sweet treat after dinner, this beginner-friendly recipe will have everyone asking for seconds.
Every spoonful delivers creamy pumpkin filling beneath a crisp, cake-mix crust studded with pecans if you like a little crunch. The evaporated milk and eggs lend richness, while granulated sugar brings just the right sweetness. As the cake bakes for about 50–60 minutes, your kitchen will fill with the enticing scent of cinnamon and nutmeg, signaling that cozy baking season is here. After a 30-minute rest, it’s ready to be served warm, topped with a dollop of whipped cream or a scoop of vanilla ice cream for an extra touch of indulgence. Let’s dive into the details so you can savor the cozy flavors of autumn with this easy Pumpkin Dump Cake recipe!
KEY INGREDIENTS IN PUMPKIN DUMP CAKE
Before we get started, let’s talk about the star players in this fall-worthy dessert and why each one matters. From creamy pumpkin puree to the golden cake topping, every ingredient works together to create layers of flavor and texture that will have your taste buds dancing.
- Pumpkin puree
This smooth, velvety base brings that distinctive autumnal taste. It provides moisture and a tender texture, making every bite rich and comforting.
- Evaporated milk
Adds creaminess without watering down the pumpkin’s flavor. Its slightly caramelized notes contribute depth and help create a custard-like consistency.
- Eggs
Act as a binder, ensuring the pumpkin mixture sets properly. They also add a subtle richness that elevates the entire dessert.
- Granulated sugar
Sweetens the filling and balances the earthy pumpkin flavor. As it bakes, it helps create the perfect contrast between the smooth center and crisp topping.
- Pumpkin pie spice
A warming blend of cinnamon, nutmeg, ginger, and cloves. It infuses the cake with those signature fall spices that make this dessert so irresistible.
- Salt
Enhances the sweetness and spices, ensuring each flavor note pops. A pinch goes a long way in rounding out the taste profile.
- Yellow cake mix
The convenient shortcut that forms the crunchy, golden crust. Its fine crumb structure bakes up beautifully atop the pumpkin layer without any fuss.
- Unsalted butter
When melted and drizzled over the cake mix, it creates pockets of buttery goodness and helps the topping achieve that glossy, golden-brown finish.
- Chopped pecans (optional)
Sprinkle them on top for an extra nutty crunch. They add texture and a toasty flavor that pairs wonderfully with pumpkin.
- Whipped cream or vanilla ice cream (optional)
A dollop of either adds a cool, creamy contrast to the warm cake. It’s the perfect finishing touch for serving.
HOW TO MAKE PUMPKIN DUMP CAKE
Let’s roll up our sleeves and dive into the step-by-step process of crafting this effortless autumn dessert. With just a few simple techniques, you’ll transform pantry staples into a show-stopping treat that’s ideal for any fall gathering or cozy night in.
1. Preheat your oven to 350°F (175°C) and grease a 9×13-inch baking dish with cooking spray or butter. This ensures your cake releases easily and develops an even crust.
2. In a large mixing bowl, combine the pumpkin puree, evaporated milk, eggs, granulated sugar, pumpkin pie spice, and salt. Whisk vigorously until the mixture is smooth and homogenous, with no streaks of pumpkin or spice left.
3. Pour the well-blended pumpkin mixture into your prepared baking dish, using a spatula to spread it out evenly so every slice gets the same creamy filling.
4. Sprinkle the dry yellow cake mix in an even layer across the top of the pumpkin. Resist the urge to stir—this is a dump cake, after all!
5. Drizzle the melted unsalted butter over the cake mix. Aim for full coverage so that each bit of dry mix has butter to help it crisp up beautifully.
6. If you’re adding nuts, scatter the chopped pecans evenly across the surface. They’ll toast in the oven and provide delightful crunch.
7. Bake in your preheated oven for 50 to 60 minutes, or until the top turns a deep golden brown and the pumpkin layer is set around the edges.
8. Remove the dish from the oven and allow it to cool for at least 30 minutes. This resting time lets the filling finish cooking and makes it easier to slice.
9. Serve your Pumpkin Dump Cake warm or at room temperature, topped with a dollop of whipped cream or a scoop of vanilla ice cream for that unforgettable indulgence.
SERVING SUGGESTIONS FOR PUMPKIN DUMP CAKE
When it comes to serving this cozy dessert, presentation and accompaniments can elevate an already delightful treat. Whether you’re hosting friends or enjoying a quiet night in, consider these fun and flavorful options to make each slice a memorable experience.
- Classic Whipped Cream Finish
Top each slice with freshly whipped cream that’s lightly sweetened and infused with a hint of vanilla. The airy texture complements the dense pumpkin layer and adds a silky mouthfeel.
- Ice Cream Scoop Surprise
Serve warm cake with a generous scoop of vanilla ice cream. As it melts, the cold cream mingles with the spicy pumpkin filling, creating a luscious sauce that’s truly indulgent.
- Caramel Drizzle Twist
Warm up some salted caramel sauce and lightly drizzle over the cake. The sweet-and-salty notes pair beautifully with pumpkin pie spice and bring an extra layer of richness.
- Spiced Latte Pairing
Offer slices alongside pumpkin spice lattes or hot coffee. The bold coffee flavors cut through the sweetness and highlight the autumn spices in the cake.
HOW TO STORE PUMPKIN DUMP CAKE
Proper storage is key to preserving the moist, spiced layers of your Pumpkin Dump Cake. Whether you want to enjoy leftovers throughout the week or prep ahead for a festive event, here are reliable methods to keep your dessert fresh and flavorful.
- Refrigerate in an Airtight Container
Transfer cooled slices to a container with a tight-fitting lid. Refrigerate for up to 3 days. Before serving, gently warm individual portions in the microwave for about 20–30 seconds to restore that just-baked feel.
- Cover With Plastic Wrap
If you’re storing the entire baking dish, press plastic wrap directly onto the cake’s surface to prevent a crust from forming. Store in the fridge, and remove the wrap before reheating in a low oven (around 300°F) until warmed through.
- Freeze for Longer Storage
Cut the cake into individual portions and wrap each slice in aluminum foil, then place in a freezer-safe bag. Freeze for up to 1 month. Thaw overnight in the fridge and reheat gently before serving.
- Maintain Toppings Separately
Store whipped cream or ice cream toppings in separate containers to avoid sogginess. Only add them right before serving to keep textures perfect.
CONCLUSION
This Pumpkin Dump Cake has everything you love about fall desserts—rich pumpkin flavor, cozy spices, and a buttery cake topping—all rolled into one easy-to-make recipe. With just 15 minutes of prep, a simple dump-and-bake method, and minimal cleanup, it’s a fail-proof way to satisfy your sweet tooth and bring warmth to any table. The optional pecans add a lovely crunch, while whipped cream or vanilla ice cream on top elevates each serving into a festive treat that’s bound to impress family and friends.
Feel free to print this article and tuck it into your recipe binder or save it for later when you’re craving a slice of autumn comfort. You’ll also find a handy FAQ below to answer any burning questions you might have as you bake. If you try this recipe, I’d love to hear how it turned out! Share your thoughts, ask any questions, or drop feedback in the comments section. Happy baking, and here’s to cozy moments and delicious memories with every bite!
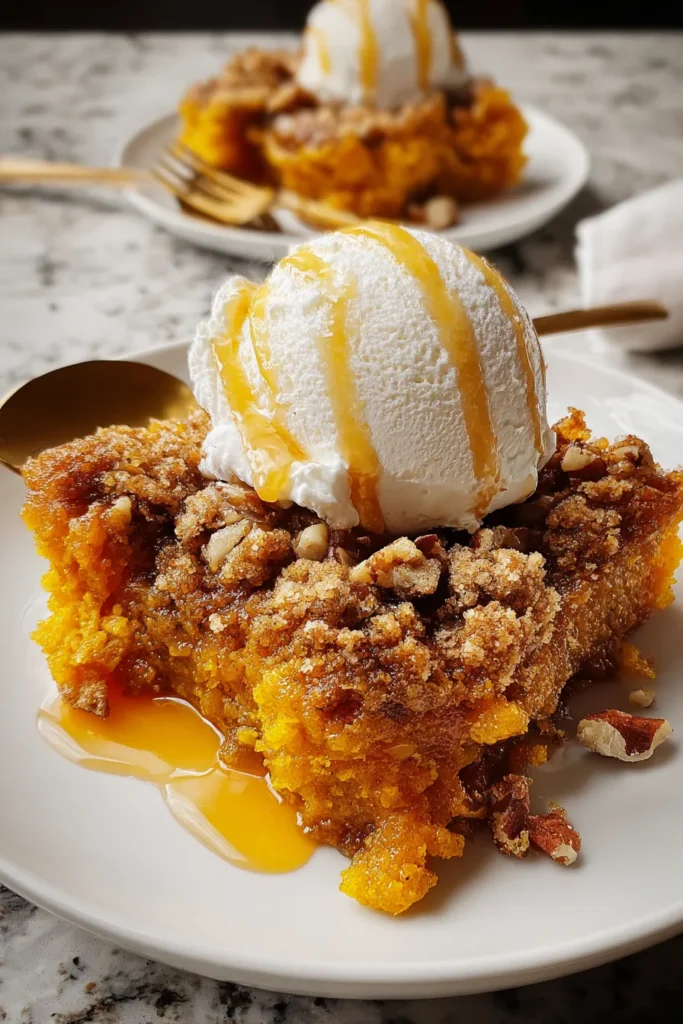

Pumpkin Dump Cake
Description
Experience the warm spices and rich pumpkin flavor in this easy dump cake that combines creamy filling and a golden cake topping. Perfect for gatherings!
Ingredients
Instructions
-
Preheat your oven to 350°F (175°C) and grease a 9x13 inch baking dish with cooking spray or butter.
-
In a large mixing bowl, combine the pumpkin puree, evaporated milk, eggs, sugar, pumpkin pie spice, and salt. Whisk until smooth and well combined.
-
Pour the pumpkin mixture into the prepared baking dish and spread it evenly.
-
Sprinkle the dry yellow cake mix evenly over the top of the pumpkin mixture. Do not stir or mix.
-
Drizzle the melted butter evenly over the top of the cake mix. Ensure that the butter covers as much of the cake mix as possible for best results.
-
If using, sprinkle the chopped pecans evenly over the top.
-
Bake in the preheated oven for 50 to 60 minutes, or until the top is golden brown and the pumpkin filling is set.
-
Remove from the oven and let cool in the dish for at least 30 minutes before serving.
-
Serve warm or at room temperature with a dollop of whipped cream or a scoop of vanilla ice cream, if desired.
Note
- This dessert is called "dump cake" because the ingredients are simply dumped into the dish without much mixing.
- For a variation, you can use spice cake mix instead of yellow cake mix for added flavor.
- This cake stores well; refrigerate leftovers for up to 3 days and reheat gently before serving.
- If you prefer a nut-free dessert, simply omit the chopped pecans.

