

Autumn’s chill has arrived, and so has our craving for cozy, comforting desserts that scream fall flavor. These no bake pumpkin cheesecake bars are the perfect way to celebrate crisp mornings and golden leaves, capturing the essence of the season in every luscious bite. With a buttery graham cracker crust that provides a satisfying crunch and a velvety pumpkin-spiced cheesecake layer, you’ll feel like you’ve wrapped yourself in a warm, cinnamon-scented blanket. The subtitle says it all: creamy, no-bake pumpkin cheesecake bars that capture the essence of fall in every delicious bite! And trust me, once you make them, they’ll become your go-to treat when the temperature drops and pumpkin dreams start dancing in your head.
Whether you’re a beginner in the kitchen or a seasoned home cook looking for an effortless sweet treat, this recipe is designed to be stress-free. Preparation only takes about 20 minutes—no oven required—and after a restful four hours in the fridge, you’ll slice into bars that hold their shape beautifully. Each serving clocks in at approximately 250 calories, making it an indulgence you can easily justify at a cozy gathering or a quiet night in. These bars are flexible, too: top them with extra whipped cream, a sprinkle of crushed graham crackers, or even a drizzle of caramel if you’re feeling adventurous. They’re a breeze to whip up, perfect for sharing, and practically disappear before you know it.
KEY INGREDIENTS IN NO BAKE PUMPKIN CHEESECAKE BARS
Before we dive into the mixing and chilling, let’s talk about the stars of the show. Each ingredient plays a crucial role in creating that signature blend of creamy texture, spicy warmth, and delightful crunch. Gather these essentials to ensure your bars turn out perfectly every time.
- Graham cracker crumbs: Forms the foundation of our crust, offering a sweet, slightly salty base that crisps up nicely and contrasts the smooth filling.
- Granulated sugar: Helps bind the graham crackers together and adds subtle sweetness to the crust.
- Unsalted butter: Melts into the crumbs, providing richness and helping the crust hold its shape without overpowering saltiness.
- Cream cheese: The heart of the cheesecake layer, delivering a tangy creaminess that balances the sweetness and pumpkin spice.
- Pumpkin puree: Infuses the filling with vibrant color, natural sweetness, and that unmistakable autumnal flavor.
- Powdered sugar: Ensures the cheesecake filling is silky smooth, sweetening without any grainy texture.
- Vanilla extract: A splash of pure vanilla ties the flavors together, enhancing both the pumpkin and cream cheese notes.
- Ground cinnamon: Brings warm, woody spice that’s quintessentially fall.
- Ground ginger: Adds a lively, zesty kick that cuts through the richness and elevates the filling.
- Ground nutmeg: Offers a subtle, nutty spice that rounds out the pumpkin blend.
- Ground cloves: A little goes a long way to introduce deep, aromatic undertones and complexity.
- Whipped topping: Lightens the cheesecake layer, creating a fluffy texture and cloud-like mouthfeel.
HOW TO MAKE NO BAKE PUMPKIN CHEESECAKE BARS
Now that your ingredients are prepped and waiting, let’s bring them together step by step. This no-bake process keeps things simple while you layer on flavor and texture for a show-stopping fall dessert.
1. In a bowl, combine the graham cracker crumbs and granulated sugar. Add the melted butter and mix until well combined. The mixture should hold together when pressed between your fingers without being too greasy.
2. Press the mixture firmly into the bottom of a 9×13 inch pan to form the crust. Use the bottom of a measuring cup or glass to compact the crumbs evenly. Refrigerate while preparing the filling to ensure the base sets up nicely.
3. In a large mixing bowl, beat the softened cream cheese until smooth. Scrape down the sides of the bowl occasionally to remove any lumps and achieve a perfectly creamy consistency.
4. Add the pumpkin puree, powdered sugar, vanilla extract, cinnamon, ginger, nutmeg, and cloves to the cream cheese. Mix until the filling is smooth and well blended, making sure the spices are evenly distributed throughout.
5. Fold in the whipped topping gently until fully combined. This lightens the mixture, giving your cheesecake layer a tender, airy texture.
6. Spread the cream cheese mixture evenly over the crust in the pan, smoothing the top with a spatula. Aim for an even thickness so each bar has the perfect balance of crust and filling.
7. Refrigerate the cheesecake bars for at least 4 hours or until set. This resting time is crucial for the flavors to meld and the filling to firm up.
8. Once set, slice into bars and serve chilled. Use a sharp knife dipped in hot water for clean edges with each cut.
SERVING SUGGESTIONS FOR NO BAKE PUMPKIN CHEESECAKE BARS
Serving these pumpkin cheesecake bars is where the magic truly shines. Whether you’re hosting a fall gathering, whipping up a holiday dessert table, or simply treating yourself, how you present them can elevate the experience and showcase those gorgeous layers of cream cheese and pumpkin spice. Here are a few creative ways to serve these bars so each bite wows your guests (or your own taste buds!).
- Drizzle with caramel sauce: Warm a jar of homemade or store-bought caramel and let it cascade over each bar in thin ribbons. The sweet, buttery caramel complements the spiced filling and adds an extra layer of indulgence.
- Top with a fresh whipped cream rosette: Pipe or dollop billowy whipped cream on each square and sprinkle with a pinch of cinnamon. The contrast between the creamy topping and firm bar is pure bliss.
- Garnish with toasted pecans: Chop pecans and toast them lightly in a dry skillet. Scatter them over the bars for a crunchy, nutty accent that echoes notes from the crust.
- Serve alongside hot spiced cider or coffee: A cozy beverage pairing brings out the pumpkin and spice in the cheesecake, making every mouthful feel like a hug in a mug.
HOW TO STORE NO BAKE PUMPKIN CHEESECAKE BARS
Proper storage is key to maintaining the dreamy texture and vibrant flavor of your pumpkin cheesecake bars. These tips will help you keep them tasting fresh, whether you’re saving leftovers for later in the week or preparing batches in advance.
- Refrigerator storage: Place the bars in a single layer on a plate or tray, then cover tightly with plastic wrap or move them into an airtight container. They’ll stay fresh for up to 5 days, perfect for midweek treats.
- Freezer storage: Wrap individual bars in plastic wrap, then transfer them to a freezer-safe bag or container. Freeze for up to 2 months, so you always have a sweet fall snack on hand. Thaw overnight in the refrigerator before serving.
- Preventing moisture: If storing whipped cream–topped bars, add the whipped cream just before serving to avoid sogginess. Keep the plain cheesecake bars chilled and add toppings as you plate.
- Labeling and dating: Always label your containers with the date made. This simple step helps you track freshness and ensures you enjoy each bar at its peak flavor.
CONCLUSION
As you can see, these no bake pumpkin cheesecake bars are more than just a dessert; they’re a celebration of fall flavors in a convenient, beginner-friendly format. We covered everything from the crunchy graham cracker crust to the perfectly spiced cheesecake filling, along with tips for serving and storing to keep your treats tasting amazing. Whether you’re new to no-bake desserts or a seasoned pro, this recipe offers a straightforward approach that delivers show-stopping results. With just 20 minutes of prep time and a four-hour chill, you’ll have a tray of elegant, mouthwatering bars ready to impress at a moment’s notice. Feel free to print this article and save it for future fall festivities—imagine pulling it out year after year whenever you crave that cozy pumpkin-spice goodness. And don’t forget, you’ll also find a FAQ section below to answer any lingering questions you might have about ingredients, substitutions, or troubleshooting.
I’d love to hear how your cheesecake bars turn out! Leave a comment if you’ve tried the recipe, have questions about the steps, or want to share your own serving ideas. Your feedback helps me refine and expand my no-bake dessert repertoire, and I’m always here to lend a hand should any kitchen curveballs come your way. Happy baking (or rather, no baking!), and here’s to many more delicious moments shared over sweet treats that taste like autumn in every bite.
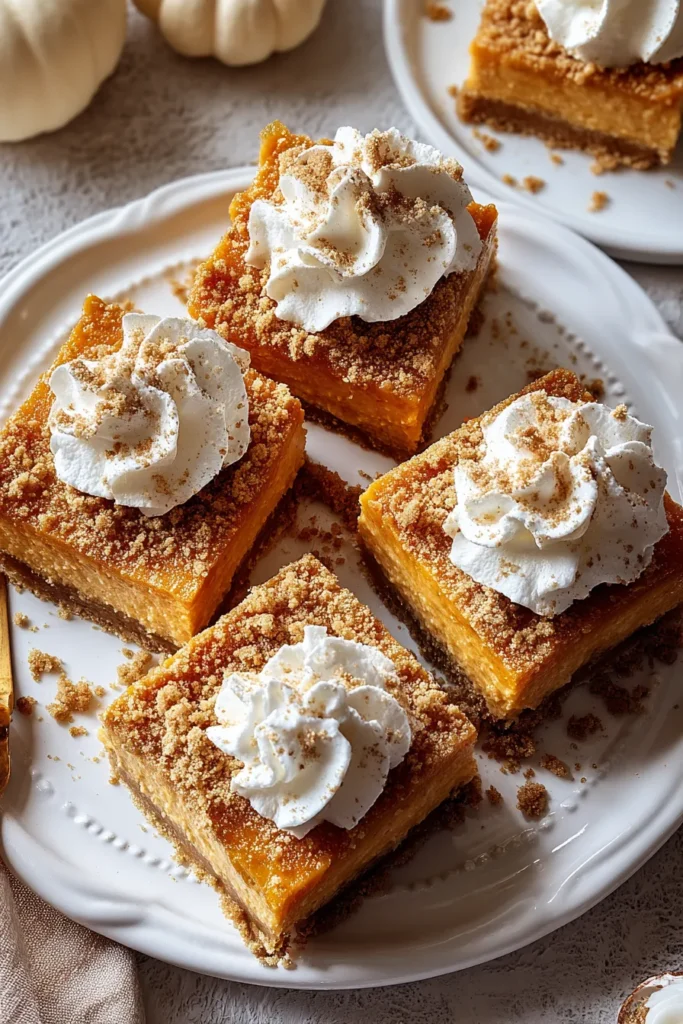

No Bake Pumpkin Cheesecake Bars
Description
These pumpkin cheesecake bars are a perfect blend of creamy, spiced filling and a crunchy graham cracker crust. Easy to make and delightful chilled, they’re perfect for gatherings or a cozy night in.
Ingredients
Instructions
-
In a bowl, combine the graham cracker crumbs and granulated sugar. Add the melted butter and mix until well combined.
-
Press the mixture firmly into the bottom of a 9x13 inch pan to form the crust. Refrigerate while preparing the filling.
-
In a large mixing bowl, beat the softened cream cheese until smooth.
-
Add the pumpkin puree, powdered sugar, vanilla extract, cinnamon, ginger, nutmeg, and cloves to the cream cheese. Mix until the filling is smooth and well blended.
-
Fold in the whipped topping gently until fully combined.
-
Spread the cream cheese mixture evenly over the crust in the pan, smoothing the top with a spatula.
-
Refrigerate the cheesecake bars for at least 4 hours or until set.
-
Once set, slice into bars and serve chilled.
Note
- For a nutty twist, consider adding a tablespoon of chopped pecans to the graham cracker crust.
- These bars can be stored in an airtight container in the refrigerator for up to 5 days.
- Using homemade whipped cream can make the bars taste even fresher.
- Top with a dollop of extra whipped cream or a sprinkle of crushed graham crackers for an enhanced presentation.

