

If you love cozy fall flavors wrapped up in a tender loaf, this mini chocolate chip pumpkin bread is about to become your new obsession. Each bite bursts with the warmth of cinnamon, nutmeg, and cloves, perfectly balanced by pockets of melty chocolate that feel like little autumn hugs. These petite loaves are the ultimate companion for crisp mornings, weekend brunches, or a late-night treat that feels indulgent yet approachable. The crumb is soft and moist, thanks to creamy pumpkin puree and rich brown sugar, while a handful of mini chocolate chips adds bursts of sweetness that dance across your taste buds. It’s the kind of recipe that makes your kitchen smell like a fall fair, and the small size means you’ll never face a gigantic loaf staring back at you—just perfectly portioned slices ready to be devoured.
I remember the first time I pulled these mini loaves from the oven: the edges were golden brown, the centers still steaming as I nudged the parchment paper to lift them out. My family couldn’t resist sneaking a slice before dinner, butter melting into the warm cake in the most irresistible way. Best part? These loaves come together in a flash—just 15 minutes to mix, 30 minutes to bake, and 10 minutes to cool. Whether you’re new to fall baking or a seasoned pro, this recipe is beginner-friendly and foolproof. With a total of about 10 slices per batch (clocking in at roughly 200 calories each), you can savor them all week or package a few as thoughtful gifts. Grab your apron, preheat that oven, and let’s whip up something unforgettable.
KEY INGREDIENTS IN MINI CHOCOLATE CHIP PUMPKIN BREAD
Every ingredient in this mini chocolate chip pumpkin bread plays a starring role in creating a loaf that’s tender, flavorful, and perfectly spiced. From the base of all-purpose flour to the finishing touch of sweet chocolate, each component works in harmony to deliver moist crumb, delightful aroma, and those signature gooey bites we all crave.
- All-purpose flour
The sturdy backbone of your loaf, it provides structure so the bread holds together without becoming heavy. This versatile flour keeps your crumb tender while giving the loaf just enough substance.
- Baking soda
This leavening agent reacts with the acidic pumpkin puree, producing carbon dioxide bubbles that help your loaf rise light and fluffy rather than dense.
- Baking powder
A secondary rise agent that kicks in during baking, ensuring the mini loaves achieve an even puff and avoid any flat spots in the center.
- Salt
A small pinch enhances all the other flavors, from the warmth of spices to the sweetness of sugar, creating a well-rounded profile without any bland corners.
- Ground cinnamon
The star spice that brings that unmistakable cozy, sweet aroma and a gentle kick of warmth to each slice.
- Ground nutmeg
Adds a subtle earthiness and depth, complementing the cinnamon for a more complex spice blend.
- Ground cloves
A little goes a long way in adding a rich, almost citrusy warmth that elevates the bread from ordinary to extraordinary.
- Granulated sugar
Sweetens the batter uniformly, assisting with the tender crumb and helping the crust develop a slight crispness.
- Packed brown sugar
Brings moisture and a hint of caramel-like richness that deepens the overall flavor and keeps the loaf soft.
- Unsalted butter
Provides a creamy richness and velvety texture, contributing both flavor and moisture when creamed into the sugars.
- Large eggs
Bind the ingredients together and introduce air during the creaming process, which leads to a lighter final texture.
- Pumpkin puree
The heart of the loaf, lending moisture, color, and that classic autumn character without any added spices if you choose canned or homemade pumpkin.
- Vanilla extract
Rounds out the flavors with its sweet floral notes, making every spice and chocolate chip pop.
- Mini chocolate chips
Tiny pockets of melted indulgence, scattering sweetness throughout the loaf and adding a delightful contrast to the warm spices.
HOW TO MAKE MINI CHOCOLATE CHIP PUMPKIN BREAD
Ready to transform these ingredients into irresistible mini loaves? Follow these steps closely for tender crumb, even rise, and gooey chocolate pockets in every slice.
1. Preheat your oven to 350°F (175°C). Grease two mini loaf pans or line them with parchment paper to ensure easy release and perfectly shaped loaves without sticking.
2. In a medium bowl, whisk together the flour, baking soda, baking powder, salt, cinnamon, nutmeg, and cloves. This dry mix distributes the leavening agents and spices evenly, preventing flavor pockets or uneven rising.
3. In a large bowl, cream together the granulated sugar, brown sugar, and softened butter. Beat until the mixture is light in color and fluffy in texture, typically 2–3 minutes with an electric mixer. This step traps air, contributing to a soft, tender crumb.
4. Beat in the eggs, one at a time, ensuring each is fully incorporated before adding the next. Stir in the pumpkin puree and vanilla extract, mixing on low speed until the batter is smooth and uniform in color.
5. Gradually add the dry ingredients to the wet ingredients, mixing on low until just combined. Overmixing can develop gluten, leading to a tougher loaf, so stop as soon as you no longer see streaks of flour.
6. Fold in the mini chocolate chips gently with a spatula. Use a light hand to avoid deflating your batter, ensuring each chip is evenly distributed throughout.
7. Divide the batter evenly between the prepared mini loaf pans, smoothing the tops so they bake uniformly.
8. Bake for 25–30 minutes, or until a toothpick inserted into the center comes out clean or with a few moist crumbs attached. The tops should spring back lightly when touched.
9. Remove the pans from the oven and allow the loaves to cool in the pans for about 10 minutes. Then transfer them to a wire rack to cool completely before slicing, which helps the crumb set and prevents crumbling.
SERVING SUGGESTIONS FOR MINI CHOCOLATE CHIP PUMPKIN BREAD
These little loaves are so versatile—they can elevate a simple breakfast, delight afternoon snackers, or star as a comforting dessert. Here are a few of my favorite ways to serve them and make each bite feel extra special.
- Serve warm with buttery spread or cream cheese: Lightly toast a slice, then slather with softened butter or whipped cream cheese. The contrast between the warm cake and cool topping is simply divine.
- Transform into an indulgent dessert a la mode: Place a generous scoop of creamy vanilla ice cream or pumpkin spice gelato on top of a warm slice. The melting ice cream creates a sweet sauce that seeps into every crumb.
- Package as homemade gifts: Wrap individual mini loaves in parchment, tie with a colorful ribbon, and add a handwritten tag. These charming bundles make thoughtful presents for neighbors, teachers, or anyone who could use a cozy pick-me-up.
- Pair with your favorite fall beverages: Serve alongside a steaming mug of coffee, chai latte, or hot cocoa. The spices in the bread highlight the flavors in your drink, creating a perfectly balanced treat.
HOW TO STORE MINI CHOCOLATE CHIP PUMPKIN BREAD
Whether you’re making a batch for the week or planning to gift a few later on, proper storage keeps your mini loaves tasting fresh and delicious. Here’s how to preserve that tender crumb and melty chocolate goodness.
- At room temperature: Once completely cooled, wrap the mini loaves tightly in plastic wrap or place them in an airtight container. They’ll stay soft and moist for up to 5 days without refrigeration.
- In the refrigerator: If you live in a warm climate or want extra longevity, wrap each loaf in plastic wrap, then store in a sealable container. Refrigerated loaves will stay fresh for up to one week—just bring them to room temperature or gently reheat before serving.
- For freezing: Wrap individual loaves or slices in aluminum foil, then place in a heavy-duty freezer bag. Label with the date and freeze for up to 3 months. Thaw at room temperature or warm in a low oven until heated through.
- Vacuum sealing: For the ultimate freshness and extended freezer storage, vacuum seal each loaf. This removes excess air and prevents freezer burn, keeping the bread tasting just-baked even after several months.
CONCLUSION
This mini chocolate chip pumpkin bread recipe is the cozy companion you’ve been waiting for, whether you’re craving a spiced morning treat or a sweet afternoon snack. We’ve walked through every step—from gathering pantry staples like all-purpose flour and warm spices to gently folding in those irresistible mini chocolate chips. With a quick 15-minute prep, a 30-minute bake, and just 10 minutes of cooling time, you’ll have tender, golden loaves ready to enjoy. Remember, these petite breads aren’t just delicious; they’re also wildly versatile. Spread them with cream cheese, serve them a la mode, package them as heartfelt gifts, or pair them with your favorite fall beverage. And with easy storage methods that keep them fresh for days or months, you’ll always have something sweet on hand.
Feel free to print this article and save it for later use—you can flip back anytime you need a dose of pumpkin-spiced inspiration. We’ve also prepared a handy FAQ section below to answer common questions, from ingredient swaps to troubleshooting tips. If you decide to give this recipe a whirl, I’d love to hear how it turned out! Drop a comment, share your tweaks, or ask any questions if you run into a snag. Whether you’re new to baking or a seasoned loaf-lover, your feedback and stories make this recipe even more special. Happy baking, and here’s to warm kitchens and delightful mini loaves!
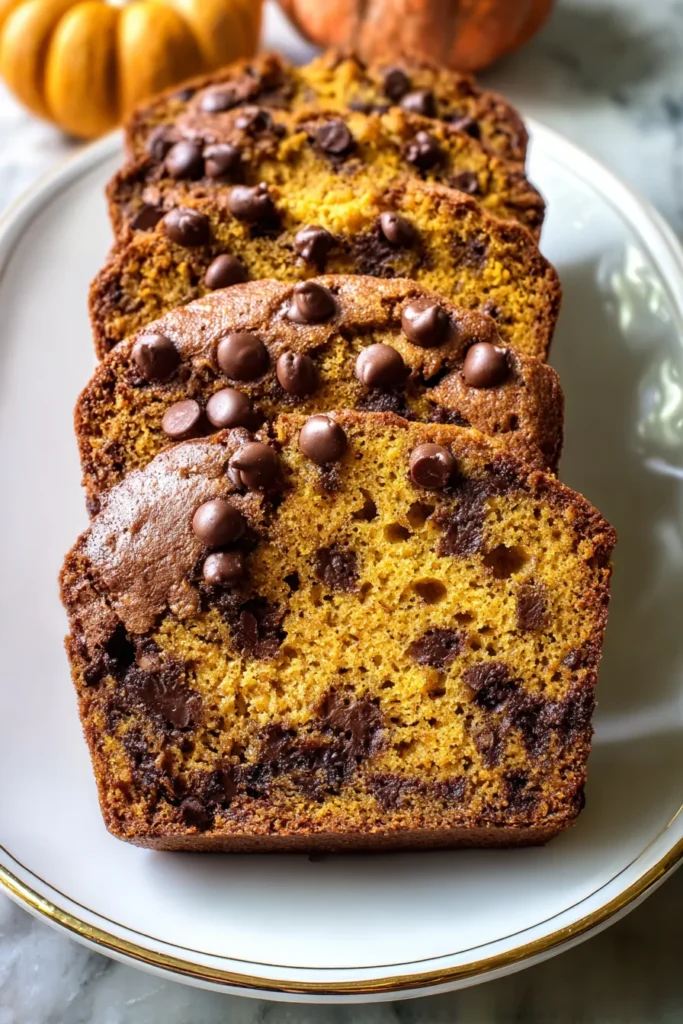

mini chocolate chip pumpkin bread
Description
Banana meets pumpkin in these mini breads, offering a cozy, spiced flavor with bursts of melted chocolate in every bite. Perfect for fall mornings or a sweet treat anytime!
Ingredients
Instructions
-
Preheat your oven to 350°F (175°C). Grease two mini loaf pans or line them with parchment paper.
-
In a medium bowl, whisk together the flour, baking soda, baking powder, salt, cinnamon, nutmeg, and cloves. Set aside.
-
In a large bowl, cream together the granulated sugar, brown sugar, and softened butter until light and fluffy.
-
Beat in the eggs, one at a time, mixing well after each addition. Stir in the pumpkin puree and vanilla extract until smooth and well combined.
-
Gradually add the dry ingredients to the wet ingredients, mixing until just combined. Be careful not to overmix the batter.
-
Fold in the mini chocolate chips gently with a spatula, ensuring they are evenly distributed throughout the batter.
-
Divide the batter evenly between the prepared mini loaf pans.
-
Bake in the preheated oven for 25-30 minutes, or until a toothpick inserted into the center comes out clean or with a few moist crumbs attached.
-
Remove from the oven and allow the loaves to cool in the pans for about 10 minutes. Then transfer them to a wire rack to cool completely before slicing.
Note
- The pumpkin puree can be homemade or canned, just ensure it's pure pumpkin without added spices.
- Add some chopped nuts, such as walnuts or pecans, for extra texture and flavor.
- These mini loaves make great gifts; wrap them in parchment and tie with a decorative ribbon.
- You can replace mini chocolate chips with dark chocolate chunks for a richer taste.
- Store in an airtight container at room temperature for up to 5 days, or freeze for longer shelf life.

