

Creamy Coconut Banana Sushi brings together sweet banana meets creamy coconut rice in these fun, bite-sized sushi rolls. Soft sticky rice bathed in coconut milk wraps around ripe banana slices, then gets a sprinkle of toasted coconut and a slick of honey for a chewy-sweet bite. This dessert sushi is surprisingly easy to make and perfect for an after-dinner treat or a playful brunch addition. Grab your rolling mat and let’s create something unforgettable—you’ll love the sweet, tropical flavors that dance in every bite.
Key Ingredients
To whip up this playful dessert, you’ll need a handful of simple ingredients that come together for a tropical treat:
- 1 cup sushi rice: Soft, sticky base that absorbs the creamy coconut milk for a chewy foundation.
- 1 cup coconut milk: Gives the rice its rich, tropical flavor and creamy texture.
- 2 tbsp sugar: Adds just the right amount of sweetness to balance the banana.
- 1/4 tsp salt: Enhances all the flavors and prevents the rice from tasting flat.
- 2 pieces banana: Provides natural sweetness and a soft, fruity center.
- 4 sheets nori: The savory seaweed wrapper that holds everything together.
- 1/4 cup shredded coconut: Adds a toasty crunch and amplifies the coconut flavor.
- 2 tbsp honey: Drizzled on top for a glossy, sweet finish.
How To Make Creamy Coconut Banana Sushi
Let’s walk through the steps to transform these ingredients into neat, bite-sized sushi rolls. You’ll cook the rice until it’s tender and flavorful, learn how to spread and roll the nori sheet perfectly, and finish with a honey drizzle that makes each piece shine.
1. Rinse the sushi rice under cold water until the water runs clear to remove excess starch. This rinsing prevents gummy rice and ensures each grain is tender.
2. Combine the rice, coconut milk, sugar, and salt in a pot over medium heat. Stir gently until the sugar dissolves and bring to a gentle boil.
3. Reduce heat to low, cover the pot, and simmer for 18 minutes until the liquid is absorbed and the rice is creamy.
4. Remove from heat and let the rice rest, covered, for 10 minutes to finish steaming. Then spread it on a plate to cool slightly for easy handling.
5. Lay one sheet of nori shiny-side down on a bamboo rolling mat. Evenly spread a thin layer of cooled coconut rice over the nori, leaving a 1-inch border at the top.
6. Sprinkle the shredded coconut over the rice, then place one banana piece lengthwise near the bottom edge.
7. Lift the edge of the mat and roll tightly into a cylinder, using gentle pressure. Seal the top edge with a bit of water.
8. With a sharp, damp knife, slice the roll into 6 to 8 pieces. Finish by drizzling each piece with honey before serving.
Serving Suggestions
When it comes to enjoying these sushi rolls, presentation and pairing can take them to the next level. Whether you’re hosting a brunch or craving a fun dessert, these bites shine with simple accoutrements. Here are a few ideas to plate and serve your Creamy Coconut Banana Sushi like a pro:
- Chilled platter: Arrange sushi pieces on a chilled serving tray to maintain firm texture and cool sweetness through every bite.
- Mint garnish: Add fresh mint leaves between the rolls for a bright contrast that complements the coconut and banana flavors.
- Dipping sauce: Serve with a small bowl of warm coconut cream drizzled with extra honey for dipping each sushi roll.
- Toasted coconut sprinkle: Dust additional toasted coconut flakes on top to enhance crunch and bring out that tropical flair.
Tips For Perfect Creamy Coconut Banana Sushi
To nail these sushi rolls every time, a few simple tricks can make your life easier in the kitchen. From choosing the right banana to chilling the roll for cleaner cuts, implementing these tips will guarantee picture-perfect slices and delightful bites.
- Use firm bananas for cleaner slices.
- Allow the rice to cool slightly for easier handling.
- Chill the roll in the fridge for 5 minutes for neater cuts.
- Serve immediately to enjoy the best texture.
How To Store It
If you need to prepare ahead or have leftovers, proper storage will help maintain the sweet, chewy texture of your banana sushi. Since this recipe features fresh banana and sticky rice, follow these guidelines to keep everything fresh and prevent sogginess:
- Refrigerate uncut rolls: Wrap the entire sushi cylinder tightly in plastic wrap and store in the fridge for up to one hour before slicing.
- Slice before serving: Keep slices in an airtight container layered with parchment paper to prevent sticking and store for up to 4 hours.
- Avoid freezing: Freezing can break down the banana texture and make the rice dry, so it’s best enjoyed fresh.
- Serve soon: For the best taste and texture, consume refrigerated sushi within 4 hours, as bananas may brown and rice harden with time.
Frequently Asked Questions
Got questions about making these fun sushi rolls? Dive into these FAQs for quick answers:
- Q: How do I prepare the sushi rice so it’s the right consistency for rolling?
A: Start by rinsing 1 cup of sushi rice under cold water until the rinse water runs clear, which removes excess starch and prevents gumminess. Combine the rinsed rice with 1 cup of coconut milk, 2 tablespoons of sugar, and 1/4 teaspoon of salt in a pot. Bring it to a gentle boil, then reduce the heat to low, cover, and simmer for 18 minutes until the liquid is absorbed. Remove from heat, let it rest covered for 10 minutes, and then spread it on a plate to cool slightly—this prevents the rice from steaming itself and becoming too soft during rolling.
- Q: What is the best way to roll the Coconut Banana Sushi tightly without tearing the nori?
A: Place a sheet of nori shiny-side down on a bamboo rolling mat. Spread a thin, even layer of cooled coconut rice over the nori, leaving a 1-inch border at the top to seal. Sprinkle shredded coconut evenly over the rice, then position one firm banana lengthwise near the bottom edge. Lift the bottom edge of the mat and roll it away from you, applying gentle but firm pressure to form a tight cylinder. Dab a little water along the top border of the nori to seal the roll and prevent tears.
- Q: Can I substitute the shredded coconut or honey with other ingredients?
A: Yes, you can customize the texture and sweetness. For a different crunch, swap shredded coconut for finely chopped toasted nuts such as almonds or pistachios. Instead of drizzling 2 tablespoons of honey, try agave syrup or maple syrup for a vegan alternative. Keep in mind these substitutes will slightly alter the flavor profile but still complement the coconut rice and banana.
- Q: How do I achieve clean slices when cutting the sushi rolls?
A: Use a very sharp knife and keep it damp to prevent sticking. After rolling, chill the entire sushi cylinder in the refrigerator for about 5 minutes—this firms it up and makes cutting neater. Wipe the knife blade clean and wet it again between cuts to maintain smooth, clean edges on each piece. Aim for 6 to 8 slices, depending on your preferred portion size.
- Q: What ripeness level of banana works best, and why?
A: Choose bananas that are firm but ripe—yellow with few brown spots—to ensure they hold their shape during slicing and rolling. Overripe bananas can become mushy and ooze juice, making the roll soggy and harder to slice cleanly. Under-ripe bananas won’t have enough natural sweetness and can be too stiff to bite through comfortably.
- Q: Can I make this recipe ahead of time, and how should I store it?
A: You can prepare and roll the sushi up to one hour in advance. After chilling the roll for 5 minutes to set its shape, wrap it tightly in plastic wrap to retain moisture. Store it in the refrigerator, uncut, to prevent dryness. Slice and drizzle with honey just before serving for the freshest texture and appearance.
- Q: What are some serving suggestions or garnishes to elevate the presentation?
A: Serve the sliced Coconut Banana Sushi on a decorative platter with small bowls of extra shredded coconut or toasted seeds for added texture. Garnish with fresh mint leaves or a sprinkle of toasted coconut on top of each slice. You can also offer a dipping sauce of warmed coconut cream sweetened with a touch of honey for an indulgent finish.
What Makes This Special
These Creamy Coconut Banana Sushi rolls are a playful spin on classic sushi, blending tropical flavors and creamy textures in each bite. The balance of sweet banana, rich coconut rice, and a hint of honey drizzle makes them irresistibly fun and satisfying. Plus, the nori wrap adds just enough savory contrast to keep things interesting. Feel free to print this recipe and tuck it into your collection for your next dessert craving. I’d love to hear your thoughts—drop a comment below if you give these rolls a try or have any questions. Happy rolling!
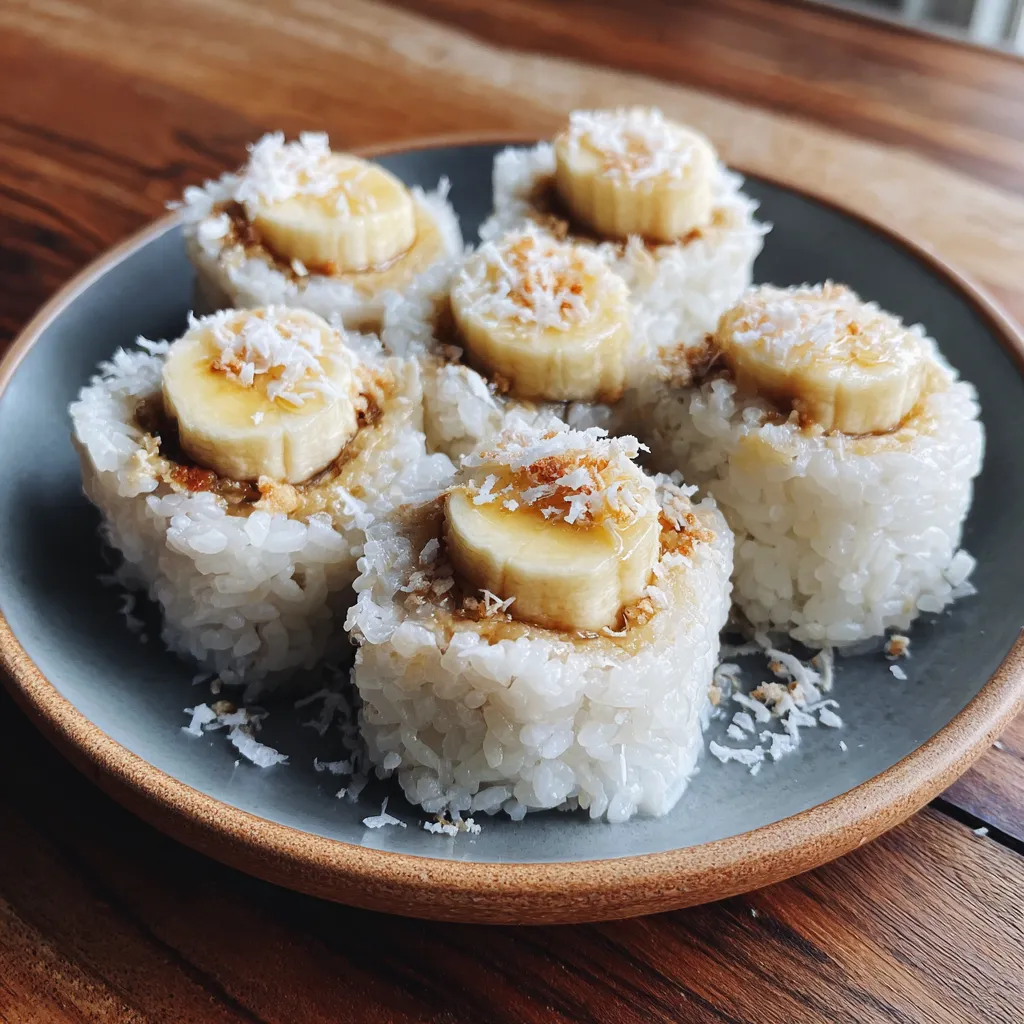

Creamy Coconut Banana Sushi
Description
Soft sticky rice bathed in coconut milk wraps around ripe banana slices, then gets a sprinkle of toasted coconut and a slick of honey for a chewy-sweet bite.
Ingredients
Instructions
-
Rinse the sushi rice under cold water until the water runs clear.
-
Combine rice, coconut milk, sugar, and salt in a pot and bring to a gentle boil.
-
Reduce heat to low, cover, and simmer for 18 minutes until the liquid is absorbed.
-
Remove from heat and let the rice rest covered for 10 minutes, then spread on a plate to cool slightly.
-
Place a sheet of nori on a bamboo rolling mat and evenly spread a thin layer of coconut rice over it, leaving a 1-inch border at the top.
-
Sprinkle shredded coconut over the rice, then place one banana piece lengthwise near the bottom edge.
-
Lift the mat edge and roll tightly into a cylinder, sealing the top edge with a bit of water.
-
Slice the roll into 6 to 8 pieces using a sharp, damp knife and drizzle with honey before serving.
Note
- Use firm bananas for cleaner slices.
- Allow the rice to cool slightly for easier handling.
- Chill the roll in the fridge for 5 minutes for neater cuts.
- Serve immediately to enjoy the best texture.

