

When the holiday spirit calls for edible décor, these Christmas Tree Cake Truffles answer the call with a burst of festive cheer. This easy-to-make triumph for vanilla lovers takes a humble boxed cake mix and elevates it by crumbling the baked sponge and binding it with luscious frosting to form bite-sized, spherical treats. Each truffle glistens under a smooth coating of melted white chocolate chips, tinted a vivid emerald hue with green food coloring, and adorned with a riot of colorful sprinkles or delicate edible glitter for that extra festive sparkle. Beginners will rejoice at the simple steps—20 minutes of prep, a quick 30-minute bake in a 9×13 pan, and an hour of chill time yield 24 perfectly portioned servings. From the first tender bite, you’ll taste the sweet vanilla cake intertwined with the creamy tang of frosting, all wrapped in velvety chocolate. Beyond their irresistible flavor profile, these truffles double as stunning edible ornaments for your holiday dessert spread, bringing together the artistry of cooking and the joy of decoration in one delightful package.
As someone who’s been known to fill my kitchen with holiday magic, I can’t help but smile at how these truffles bring people together. Last year’s impromptu dessert tasting turned into a full-blown celebration when guests noshed on these bright-green confections, each one sparking compliments and curious questions about how simple they were to make. With roughly 180 calories per truffle, they strike a lovely balance between indulgence and restraint, satisfying sugar cravings without derailing holiday diets. My brother even suggested turning the leftover frosting into colorful DIY decorations, while my niece discovered the thrill of sprinkling her own edible glitter, declaring herself “Chief Truffle Designer.” I’ve experimented with swapping in cream cheese frosting for added tang and tried red and green sprinkles to ramp up the color contrast. The best part? You can personalize these festive bites to fit any theme—from classic Christmas reds and greens to an elegant winter wonderland palette. So grab your favorite cake mix, invite loved ones into the kitchen, and get ready to whip up a batch of these beginner-friendly, crowd-pleasing holiday treats that taste as delightful as they look.
KEY INGREDIENTS IN CHRISTMAS TREE CAKE TRUFFLES
Before we dive into the step-by-step magic of turning cake crumbs into dessert ornaments, let’s meet the stars of our recipe. Each component plays a vital role in achieving the perfect balance of texture, flavor, and festive flair.
- Vanilla cake mix
A trusty foundation that provides the sweet, buttery crumb and consistent rise. This boxed mix simplifies baking by bringing together flour, sugar, leaveners, and vanilla flavor in perfect harmony.
- Frosting
The binding agent that transforms crumbled cake into a pliable dough. Choose store-bought vanilla for convenience or homemade cream cheese for a tangy twist that cuts through sweetness.
- White chocolate chips
Deliver a silky, glossy shell around each truffle. When melted, they create a smooth coating that easily absorbs vibrant green coloring and holds decorations in place.
- Vanilla extract
A splash of pure vanilla intensifies the cake’s aromatic profile and deepens flavor complexity, ensuring every bite tastes irresistibly homemade.
- Green food coloring
Gel or liquid varieties work equally well to tint melted chocolate into a festive emerald green, turning simple treats into miniature Christmas trees.
- Sprinkles or edible glitter
Add that joyful holiday sparkle. Choose classic red-and-green confetti or shimmering glitter to mimic twinkling lights on a frosted tree.
- Candy canes or mini chocolate chips (optional)
Tiny extras that double as tree toppers or decorative accents. Crushed candy canes lend a peppermint crunch, while mini chips add contrast and chew.
HOW TO MAKE CHRISTMAS TREE CAKE TRUFFLES
Get ready for a fun and straightforward baking adventure that takes you from boxed cake to charming truffle in just a few easy stages. We’ll cover baking, crumbling, mixing, chilling, dipping, and decorating in simple steps so you can create a tray of festive bites without breaking a sweat.
1. Preheat and bake the cake
Preheat your oven according to the cake mix instructions and grease a 9×13-inch pan. Pour in the prepared batter and bake until a toothpick inserted in the center comes out clean. Let the cake cool completely in the pan before moving on.
2. Crumble the cake
Transfer the cooled cake to a large bowl. Use your hands or a fork to break it down into fine, even crumbs, ensuring there are no large chunks left behind.
3. Mix in the frosting
Add the frosting to the crumbs and gently fold until a moist, cohesive dough forms. You’re aiming for a texture that holds together when gently pressed into a ball.
4. Shape the cake balls
Scoop out about a tablespoon of the mixture and roll it between your palms to create a smooth, 1-inch ball. Place each truffle on a parchment-lined baking sheet. Continue until all the mixture is used.
5. Chill the truffles
Refrigerate the sheet for at least 30 minutes. This firms up the interior so the balls maintain their shape during dipping.
6. Melt the white chocolate
Place the white chocolate chips in a microwave-safe bowl. Heat in 30-second intervals, stirring after each burst, until the chocolate is fully melted and silky smooth.
7. Tint the chocolate
Stir in a few drops of green food coloring until you achieve a rich, holiday-ready shade. Adjust gradually to reach your perfect hue.
8. Dip the cake balls
Remove the chilled truffles from the fridge. Holding each ball with a fork or dipping tool, immerse it in the green chocolate, coating completely. Tap off any excess before returning it to the parchment.
9. Decorate while wet
Sprinkle festive confetti, edible glitter, or other tiny embellishments on top of each truffle before the chocolate sets to ensure they stick.
10. Set and enjoy
Let the truffles sit at room temperature or pop them back in the fridge for about 30 minutes, until the chocolate shell is fully hardened and ready to serve.
SERVING SUGGESTIONS FOR CHRISTMAS TREE CAKE TRUFFLES
You’ve mastered the art of decorating these Christmas Tree Cake Truffles—now let’s talk about how to serve them in style. Whether you’re hosting a festive gathering, packing gift boxes, or creating a dessert buffet, these ideas will ensure your truffles shine as bright as tinsel on the tree.
- Decorate an elegant dessert display by arranging the truffles on a multi-tiered cake stand. Interweave candy canes or holly sprigs to elevate the festive presentation and make each bite look like a miniature ornament.
- Pair with steaming mugs of hot cocoa and marshmallows. The cool, crisp chocolate coating contrasts beautifully with a warm mug, turning every mouthful into a cozy treat that feels straight out of a holiday storybook.
- Assemble giftable holiday boxes by lining small gift boxes or tins with colorful parchment paper. Nestle a dozen truffles inside each, secure them with ribbon, and include a handwritten note for a thoughtful, homemade present that neighbors and coworkers will adore.
- Host a festive dipping station at your next holiday party. Set out bowls of melted white chocolate tinted different shades, a variety of sprinkles, chopped nuts, and crushed candy canes. Let guests customize their own edible tree ornaments in a fun, interactive activity.
HOW TO STORE CHRISTMAS TREE CAKE TRUFFLES
Proper storage is key to maintaining the texture, flavor, and visual appeal of your festive truffles. Whether you want to make them a day in advance or freeze extras for holiday entertaining, these tips will help you preserve every bit of goodness.
- Refrigeration
Place finished truffles in a single layer inside an airtight container. Store in the fridge for up to one week. This keeps the chocolate shell firm and the interior moist without drying out.
- Freezing
For longer storage, arrange the truffles on a parchment-lined tray and freeze until solid. Transfer them to a freezer-safe bag or container with parchment layers to prevent sticking. They’ll keep for up to one month—just thaw in the fridge before serving.
- Layered storage
If you need to stack truffles, separate each layer with parchment or wax paper. This simple step prevents decorations from rubbing off and keeps your truffles looking pristine.
- Room-temperature display
If you plan to serve within 24 hours, you can keep the truffles in a cool, dry spot away from direct sunlight. Use a covered platter or dome to protect them from dust and maintain their festive shine.
CONCLUSION
Whether you’re decking your halls or simply craving an adorable, bite-sized holiday dessert, these Christmas Tree Cake Truffles are a winner for every occasion. With a straightforward ingredient list, minimal equipment, and just over an hour from start to finish, they’re the perfect choice for both baking pros and kitchen rookies. We’ve broken down each step—from mixing boxed vanilla cake mix with frosting to mastering that smooth green chocolate dip—so you can achieve consistent, picture-perfect results every time. The combination of sweet vanilla sponge, creamy frosting binder, and glossy chocolate coating brings a symphony of textures and flavors to the table. Plus, customizable decorations let your creativity run wild, whether you choose classic red-and-green sprinkles, shimmering edible glitter, or peppermint-infused candy cane shards.
Feel free to print this article and save it for your holiday recipe binder or digital archives—these truffle trees will become a new seasonal favorite, guaranteed to impress friends, family, and gift recipients alike. Below, you’ll find a helpful FAQ section that answers common questions about troubleshooting chocolate temper, ingredient swaps, and storage tips. If you give this recipe a whirl, I’d love to hear how it turned out. Leave a comment with your questions, feedback, or personal decorating ideas, and share any fun twists you’ve tried. Your insights are what make home baking such a joy, and I can’t wait to see your festive creations come to life!
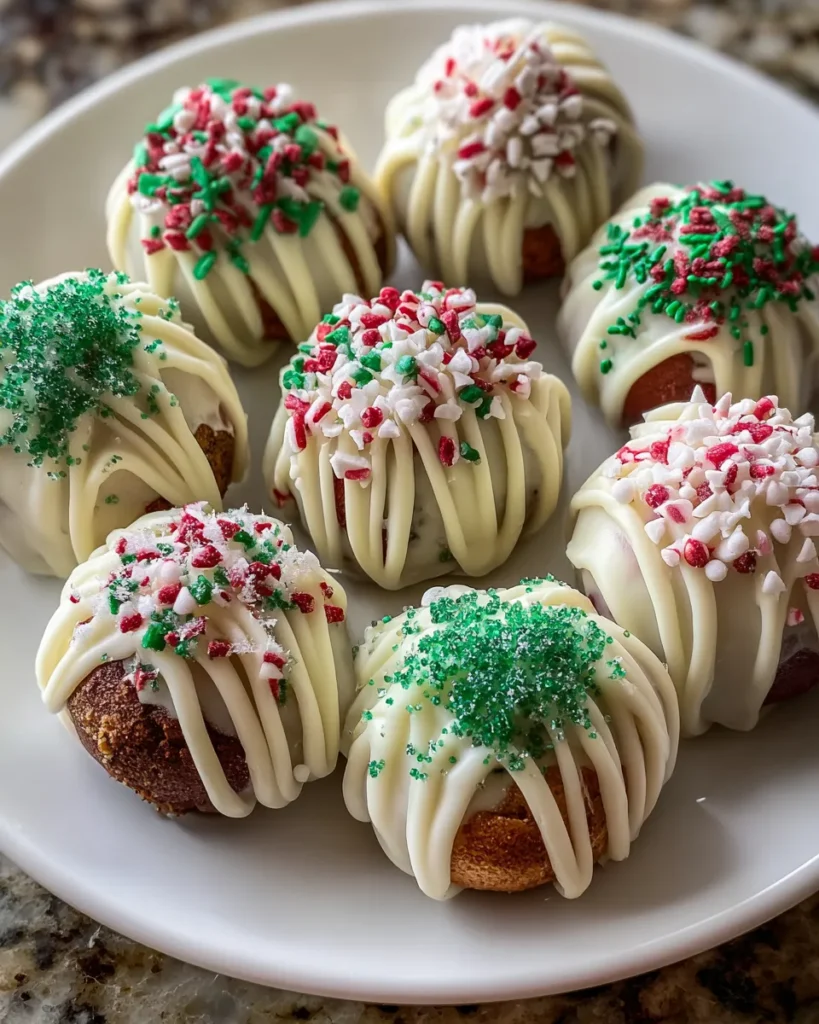

Christmas Tree Cake Truffles
Description
These Christmas Tree Cake Truffles are a delightful celebration of vanilla cake and creamy frosting, coated in vibrant green chocolate, perfect for holiday indulgence!
Ingredients
Instructions
-
Prepare the vanilla cake mix according to the package instructions. Bake in a 9x13 inch pan until a toothpick inserted in the center comes out clean. Allow the cake to cool completely in the pan.
-
Once the cake is cooled, crumble it into a large mixing bowl. Use your hands or a fork to break it down into fine crumbs.
-
Add the cup of frosting to the crumbled cake and mix until well combined. You want to achieve a moist consistency that holds together when formed into a ball.
-
Using your hands, roll the cake mixture into 1-inch balls and place them onto a parchment-lined baking sheet. Repeat until all the mixture is used up. Refrigerate the cake balls for at least 30 minutes to firm up.
-
While the cake balls are chilling, melt the white chocolate chips in a microwave-safe bowl in 30-second intervals, stirring each time until fully melted and smooth.
-
Add a few drops of green food coloring to the melted chocolate, stirring until you achieve your desired shade of green.
-
Remove the cake balls from the refrigerator. Using a fork or dipping tool, dip each ball into the melted green chocolate, ensuring they are fully coated. Allow excess chocolate to drip off before placing them back onto the parchment-lined sheet.
-
While the chocolate is still wet, sprinkle the tops with festive sprinkles or edible glitter to create a decorative look.
-
If desired, place tiny pieces of candy canes or mini chocolate chips on top of the truffles for added decoration.
-
Allow the truffles to set at room temperature or in the fridge for about 30 minutes until the chocolate hardens completely.
Note
- These truffles can be stored in an airtight container in the fridge for up to one week.
- Feel free to experiment with different flavor combinations by using different cake mixes and frostings.
- You can customize the decoration based on your theme—use red and green sprinkles for a classic look or even themed edible decorations for different holiday traditions.

