

This Cherry Cheesecake Dump Cake is pure dessert magic in minutes. Cream cheese blends into a velvety base beneath bright cherry filling, topped with a golden, buttery cake layer that bakes crisp at the edges and soft in the center. Whether you’re craving a quick weekend treat or an impressive yet effortless holiday dessert, this recipe delivers show-stopping flavor with almost no fuss—perfect for beginner bakers and pros alike!
Key Ingredients
Before you get started, gather these simple ingredients to build layers of creamy cheesecake, juicy cherries, and a golden cake crust:
- 8 ounce cream cheese: A velvety base that turns into a smooth cheesecake layer.
- 1/4 cup granulated sugar: Adds subtle sweetness to the cheesecake filling.
- 1 large egg: Binds the cheesecake mixture for a perfect set.
- 1 teaspoon vanilla extract: Infuses warm, aromatic flavor into the cheesecake layer.
- 21 ounce can cherry pie filling: Bursts with juicy fruit and tangy-sweet flavor.
- 15.25 ounce box yellow cake mix: Creates a crisp, buttery crust once baked.
- 1/2 cup unsalted butter, melted: Drizzles over the cake mix to create golden browning.
How To Make Cherry Cheesecake Dump Cake
This easy dump cake method layers ingredients in just three steps—no mixing bowls beyond the cheesecake blend! You’ll start by preparing a creamy cheesecake base, top it with vibrant cherry filling, then finish with a dry cake mix and melted butter for that irresistible golden crust. Follow each step carefully to ensure every layer bakes perfectly and the textures meld beautifully.
1. Preheat the oven to 350°F, positioning the rack in the center for even browning.
2. In a medium bowl, beat the cream cheese, sugar, egg, and vanilla extract until completely smooth and creamy.
3. Spread the cheesecake mixture evenly across the bottom of a 9×13-inch baking pan, smoothing it with a spatula.
4. Spoon the cherry pie filling over the cheesecake layer, distributing the cherries so they cover every bit.
5. Sprinkle the dry yellow cake mix evenly over the cherries, ensuring full coverage for a golden crust.
6. Drizzle the melted butter over the cake mix layer, saturating it so every spot bakes crisp and buttery.
7. Bake for 35 to 40 minutes or until the top turns golden brown and the cherry filling bubbles at the edges.
8. Once baked, cool the cake to room temperature, then refrigerate for at least 2 hours before slicing and serving.
Serving Suggestions
This Cherry Cheesecake Dump Cake is delightful on its own, but these serving ideas take it over the top:
- Warm and Gooey: Serve a slice slightly warm straight from the oven to enjoy melty edges against the chilled cheesecake.
- Topped with Whipped Cream: Add a fluffy dollop of whipped cream for light sweetness and extra creaminess.
- Vanilla Ice Cream Pairing: Place a scoop of vanilla ice cream on each slice for a dreamy hot-and-cold contrast.
- Crunchy Nut Garnish: Sprinkle chopped nuts like pecans or almonds on top before serving to add a satisfying crunch.
Tips For Perfect Cherry Cheesecake Dump Cake
A few insider tricks will make your Cherry Cheesecake Dump Cake shine every time. These friendly pointers help ensure clean slices, customizable flavors, and an extra-special finish.
- Refrigerating helps the cheesecake layer firm up for cleaner slices.
- Serve with whipped cream or a scoop of vanilla ice cream.
- You can substitute blueberry or peach pie filling for a different flavor.
- For extra crunch, sprinkle chopped nuts on top before baking.
How To Store It
To keep your Cherry Cheesecake Dump Cake fresh and delicious, follow these storage tips so every slice tastes just as good the next day:
- Refrigerate leftovers in the original pan wrapped tightly with plastic wrap or foil to keep the cheesecake layer firm and the cake from drying out; it will stay fresh for up to 4 days.
- Freeze individual slices by wrapping each piece in plastic wrap and aluminum foil, then placing them in a freezer-safe container; they’ll keep for up to 2 months.
- Thaw frozen slices overnight in the refrigerator, then let them sit at room temperature for 10 minutes before serving for easier cutting.
- Reheat gently in a low oven or microwave if you prefer a warm slice—just watch the cheesecake layer so it doesn’t soften too much.
Frequently Asked Questions
Here are some quick answers to common questions so you can bake with confidence:
- How long does it take to prepare this Cherry Cheesecake Dump Cake?
It takes about 15 minutes to prepare the layers—beating the cheesecake mixture, spreading it, spooning on the pie filling, sprinkling the cake mix, and drizzling with butter. Then bake for 35 to 40 minutes and chill for at least 2 hours before serving, for a total time of roughly 3 hours.
- Can I substitute a different pie filling for the cherry pie filling?
Yes. You can swap in blueberry or peach pie filling for a different fruit flavor without changing any other ingredients or steps. Just spoon the alternative filling over the cheesecake layer in the same way you would the cherry filling.
- What’s the best way to get clean slices of this dump cake?
Refrigerate the baked cake for at least 2 hours to allow the cheesecake layer to firm up. Use a sharp knife and wipe it clean between cuts. Chilling prevents the layers from slipping and makes serving neater.
- Can I use low-fat or fat-free cream cheese in this recipe?
You can, but the texture may be less rich and a bit softer. If you choose low-fat cream cheese, ensure it’s well softened before beating so the cheesecake layer is smooth. The final taste will be lighter, but still enjoyable.
- How should I store leftovers and how long do they keep?
Cover the pan tightly with plastic wrap or aluminum foil and refrigerate. Leftovers will stay fresh for up to 4 days. For longer storage, you can freeze individual slices wrapped in plastic and foil for up to 2 months.
- Can I make this cake ahead of time for a party?
Absolutely. Bake the cake a day in advance, let it cool, then refrigerate overnight. It will firm up nicely, and you can slice and serve it the next day, topping with whipped cream or ice cream just before guests arrive.
- What can I do if the top isn’t golden brown or bubbly after 40 minutes?
If the cake mix topping isn’t golden, slide it under the broiler for 1 to 2 minutes, watching closely to prevent burning. The bubbling of the fruit filling will indicate that the interior is fully heated.
- How can I add extra texture or flavor to this dump cake?
For crunch, sprinkle 1/2 cup of chopped nuts—such as pecans or almonds—over the cake mix before drizzling butter. You can also stir in a teaspoon of ground cinnamon into the cake mix for a warm spice note.
What Makes This Special
This Cherry Cheesecake Dump Cake stands out because it marries creamy cheesecake, vibrant cherries, and a buttery cake crust in just a few easy steps—no fancy techniques required! It’s perfect for busy bakers who want show-stopping results, and the dump-and-bake method means minimal cleanup. The combination of tart fruit, velvety filling, and crisp topping is downright addictive. Go ahead and print this recipe to save for a rainy day, then come back and let me know how it turned out or ask any questions. I can’t wait to hear your feedback!
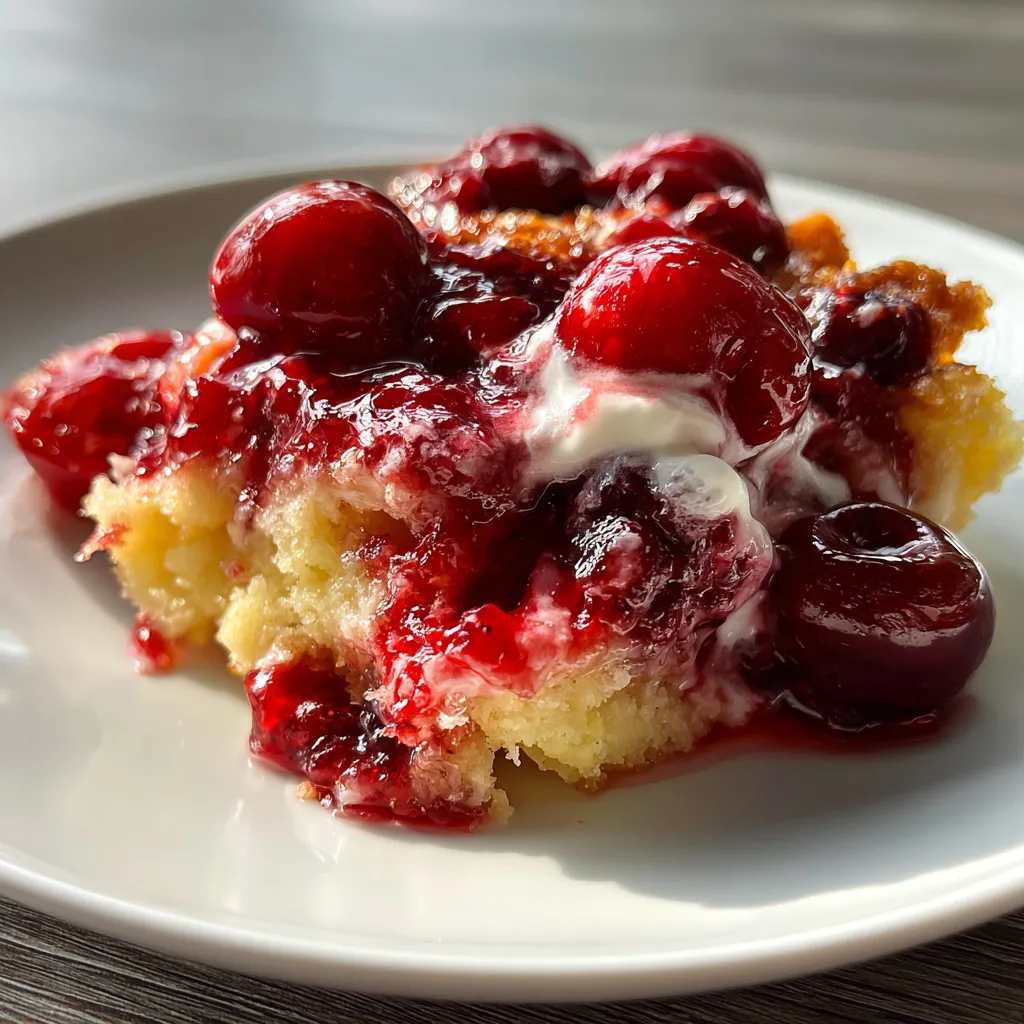

Cherry Cheesecake Dump Cake
Description
Cream cheese blends into a velvety base beneath bright cherry filling, topped with a golden, buttery cake layer that bakes crisp at the edges and soft in the center
Ingredients
Instructions
-
Preheat the oven to 350 degrees F.
-
In a medium bowl beat the cream cheese, sugar, egg, and vanilla until smooth.
-
Spread the cheesecake mixture evenly in the bottom of a 9x13-inch baking pan.
-
Spoon the cherry pie filling over the cheesecake layer.
-
Sprinkle the dry yellow cake mix evenly over the cherries.
-
Drizzle the melted butter over the top of the cake mix.
-
Bake for 35 to 40 minutes or until the top is golden brown and bubbly.
-
Allow the cake to cool to room temperature, then refrigerate for at least 2 hours before serving.
Note
- Refrigerating helps the cheesecake layer firm up for cleaner slices.
- Serve with whipped cream or a scoop of vanilla ice cream.
- You can substitute blueberry or peach pie filling for a different flavor.
- For extra crunch, sprinkle chopped nuts on top before baking.

