

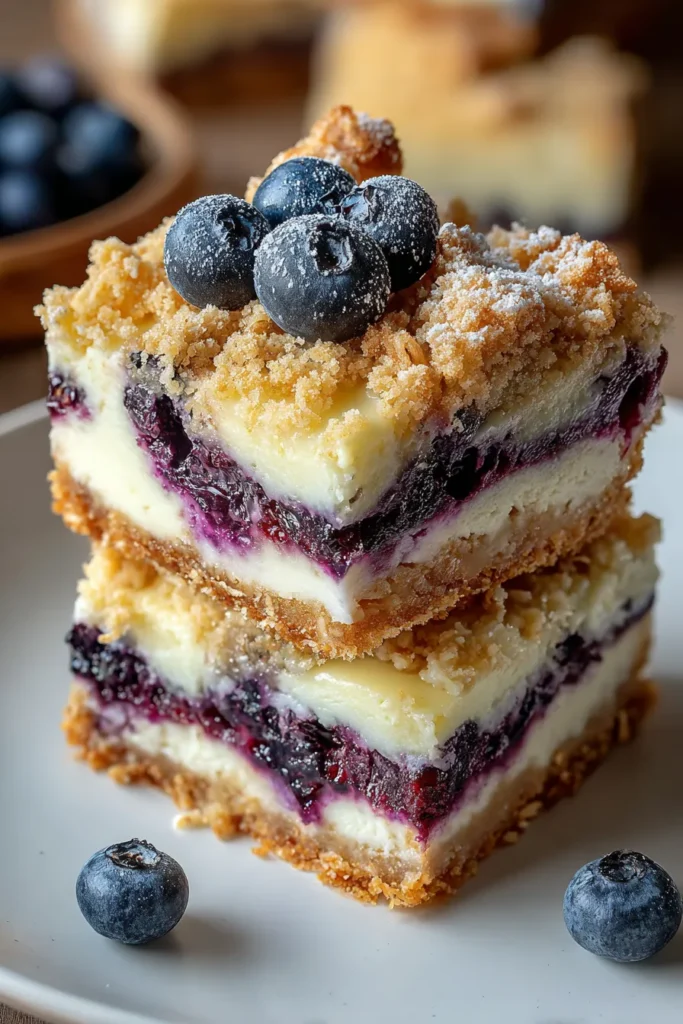
There’s something so satisfying about a dessert that brings layers of flavor and texture together in one glorious bite. These blueberry bars with cheesecake layers are the perfect example of sweet and tangy bliss. A buttery oat crust meets a smooth, tangy cheesecake filling, and then it’s crowned with juicy fresh blueberries—each bite feels like a little celebration. Whether you’re new to baking or you’re a weekend pastry pro, these bars are surprisingly simple to pull off. As someone who’s spent countless weekends experimenting in a bright, sunlit kitchen, I can tell you that the thrill of peeling back a slice to reveal those distinct layers never gets old.
Every time I bake these bars, I feel like I’m inviting a wave of summer into my home. The crust has that gentle crunch from rolled oats, hugging the creamy cheesecake layer so lovingly. And when those berries bake down just a touch, they burst with sweetness and a hint of lemony zing that cuts through the richness perfectly. You’ll find yourself cutting slice after slice, sneaking tastes while nobody’s looking, and charming your friends with this delightful treat. Trust me, the smiles that follow the first taste are absolutely priceless, and before long you’ll be jotting down napkin notes on how to tweak the recipe—you might add cinnamon one day, or extra lemon zest the next. Baking, after all, is as much about the journey as the destination, and these bars make that journey feel like pure, delicious magic.
KEY INGREDIENTS IN BLUEBERRY BARS WITH CHEESECAKE LAYERS
Let’s break down why each ingredient is a superstar in this recipe. From the foundation of the crust to the juicy blueberry topping, every component plays a special role in achieving the perfect balance of flavors and textures.
- All-purpose flour
Provides the structural backbone for the oat crust. When mixed with butter and sugar, it forms a tender, golden base that holds everything together.
- Rolled oats
Add rustic texture and a gentle chew to the crust. They also help absorb excess butter, ensuring the bars don’t become greasy.
- Brown sugar
Brings a hint of caramel-like warmth to the crust, complementing the buttery notes and creating a deeper sweetness than white sugar alone.
- Baking soda
Gives a slight lift and lightness to the oat-based crust, ensuring it doesn’t turn dense or heavy once baked.
- Salt
Enhances all the sweet layers and balances the flavors, ensuring the sugar doesn’t overwhelm your taste buds.
- Unsalted butter
Binds the crust ingredients together, providing richness and that melt-in-your-mouth texture every great bar should have.
- Vanilla extract
Adds aromatic warmth to both the crust and cheesecake layers, bringing out the natural sweetness of the blueberries.
- Cream cheese
Forms the luscious, tangy layer that sets these bars apart from ordinary fruit bars. It’s the heart of the cheesecake component.
- Granulated sugar
Sweetens the cheesecake filling and helps tenderize its texture without making it overly dense or grainy.
- Egg
Acts as a binding agent in the cheesecake mixture, ensuring a smooth, cohesive layer that holds up when sliced.
- Lemon zest
Provides bright acidity and a citrusy pop, cutting through the richness of the cream cheese and accentuating the berries.
- Fresh blueberries
Deliver juicy bursts of flavor and color. Their natural sweetness pairs beautifully with the creamy layer beneath.
- Cornstarch
Thickens the blueberry topping, helping it set and preventing the juices from making the bars soggy.
- Lemon juice
Balances the sweetness of the blueberries and sugar, adding refreshing tang and depth.
HOW TO MAKE BLUEBERRY BARS WITH CHEESECAKE LAYERS
Ready to dive in? These step-by-step instructions will guide you through creating the buttery crust, silky cheesecake center, and vibrant blueberry topping. Follow along closely and you’ll have a tray of stunning bars ready to impress.
1. Preheat the oven to 350°F (175°C). Grease an 8×8-inch baking pan and line it with parchment paper for easy removal and clean edges.
2. In a medium bowl, combine the flour, oats, brown sugar, baking soda, and salt. Stir in the melted butter and vanilla extract until you have a crumbly mixture that holds together when pressed.
3. Press two-thirds of this oat mixture firmly into the bottom of your prepared pan, creating an even crust layer. Set aside the remaining crumbs for the topping.
4. In a separate bowl, beat the softened cream cheese with granulated sugar until smooth and creamy. Add the egg, lemon zest, and vanilla extract, then mix until everything is well combined and silky.
5. Spread the cheesecake mixture evenly over the crust, using a spatula to smooth out the surface.
6. In another bowl, toss the fresh blueberries with granulated sugar, cornstarch, and lemon juice. Make sure each berry is coated in the mixture for even baking.
7. Spread the blueberry mixture gently over the cheesecake layer, distributing the berries so every slice has fruit in it.
8. Sprinkle the remaining oat mixture over the blueberries, pressing lightly to adhere without fully flattening—it should look rustic and inviting.
9. Bake in the preheated oven for 35-40 minutes, or until the top turns golden brown and you see the edges bubbling around the pan.
10. Remove from the oven and allow the bars to cool completely in the pan. This helps the layers set up for neat slices.
11. Chill in the refrigerator for at least 2 hours before cutting into bars. This resting time is crucial for achieving the perfect texture.
SERVING SUGGESTIONS FOR BLUEBERRY BARS WITH CHEESECAKE LAYERS
Once your bars are perfectly chilled, it’s time to think about how to serve them. These bars shine on their own, but there are a few fun ways to elevate the experience and make each presentation feel special.
- Lightly dusted with powdered sugar
Just before serving, sift a thin layer of powdered sugar over the top for a delicate, snowy effect. This simple touch adds a hint of extra sweetness and makes each bar look picture-perfect.
- With a dollop of freshly whipped cream
Whip heavy cream with a splash of vanilla and a teaspoon of sugar until soft peaks form. A generous spoonful on each slice adds fluffy richness that complements the tangy cheesecake.
- Blueberry sauce drizzle
Simmer a handful of additional blueberries with a bit of sugar and lemon juice until they break down. Strain for a smooth sauce or leave chunky for texture, then spoon over warm or chilled bars.
- Paired with iced tea or coffee
Serve these bars alongside a bright iced tea with mint leaves or a rich, dark coffee. The contrast between the fruity-sweet bars and a crisp beverage makes for a delightful afternoon pick-me-up.
HOW TO STORE BLUEBERRY BARS WITH CHEESECAKE LAYERS
Keeping these bars fresh and delicious is all about the right method. Whether you’re saving leftovers for a snack tomorrow or prepping them days in advance, follow these tips to maintain that lovely contrast of textures and vibrant flavor.
- Store in an airtight container in the refrigerator
After cooling and chilling, transfer the bars (still cut or in the pan) to a sealed container. This prevents them from absorbing fridge odors and keeps the cheesecake layer from drying out.
- Wrap individual bars in plastic wrap
For grab-and-go convenience, wrap each bar tightly in plastic. This double protection helps them stay moist while making it easy to pack lunches or serve guests without fuss.
- Freeze for longer storage
Place bars in a single layer on a baking sheet to flash freeze, then stack them with parchment paper between layers in a freezer-safe bag. They’ll last up to one month—just thaw in the fridge before enjoying.
- Let thawed bars come to room temperature briefly
Once removed from the freezer or fridge, allow bars to rest at room temperature for 10–15 minutes. This brings out the full flavor of the cheesecake and lets the crust soften just enough for the perfect bite.
CONCLUSION
I hope this deep dive into blueberry bars with cheesecake layers has you feeling inspired to fire up your oven. We’ve covered everything from the buttery oat crust that holds it all together to the tangy-sweet cheesecake layer and those jewel-like blueberries that burst with flavor. You’ve got the complete list of ingredients, step-by-step instructions, serving ideas, and storage tips—all rolled into one handy guide. Feel free to print this article or save it to your favorite recipe folder for easy reference. And don’t worry—if you’re curious about substitutions, troubleshooting, or creative tweaks, there’s a handy FAQ waiting just below (no spoilers here, though!).
Baking is as much about community as it is about technique, so I’d love to hear how your bars turn out. Did you sprinkle cinnamon in the crust for a warm twist? Maybe you served them with a scoop of vanilla ice cream on top? Drop a comment, share your questions, or let me know if there’s anything I can clarify. Your feedback helps me make future recipes even better, and I can’t wait to read about your baking adventures. Happy baking, and here’s to many more delicious dessert moments!

Blueberry Bars with Cheesecake Layers
Description
These delightful blueberry bars feature a buttery oat crust, creamy cheesecake filling, and a burst of fresh blueberries, creating a perfect balance of flavors in each bite!
Ingredients
Instructions
-
Preheat the oven to 350°F (175°C). Grease an 8x8-inch baking pan and line it with parchment paper for easy removal.
-
In a medium bowl, combine flour, oats, brown sugar, baking soda, and salt. Stir in the melted butter and vanilla extract until crumbly.
-
Press two-thirds of the oat mixture firmly into the prepared baking pan, setting aside the remaining mixture.
-
In a separate bowl, beat the softened cream cheese and 1/4 cup of granulated sugar until smooth. Add the egg, lemon zest, and 1/2 teaspoon of vanilla extract, mixing until well combined.
-
Spread the cream cheese mixture evenly over the crust in the baking pan.
-
In another bowl, toss the blueberries with 1 tablespoon granulated sugar, cornstarch, and lemon juice until evenly coated.
-
Spread the blueberry mixture over the cheesecake layer.
-
Sprinkle the remaining oat mixture over the blueberries, pressing gently.
-
Bake in the preheated oven for 35-40 minutes, or until the top is golden brown and the edges are bubbling.
-
Remove from the oven and allow to cool completely in the pan.
-
Chill in the refrigerator for at least 2 hours before cutting into bars.
Note
- You can substitute fresh blueberries with frozen ones, but make sure they are well-drained.
- For a twist, try adding a sprinkle of cinnamon to the oat mixture.
- These bars can be stored in the refrigerator for up to 4 days.
- Serve with a dollop of whipped cream or a scoop of vanilla ice cream for an extra treat.

