

Get ready to dive into a bowl of utter comfort that marries velvety cheese sauce with that satisfying crackle of a golden crust. Creamy, dreamy, and whipped up with a crunchy panko topping, this Baked Mac and Cheese with a Crunch is the kind of dish that sends your taste buds on a first-class trip to Comfort Food Central. Every scoop delivers al dente elbow macaroni drenched in a luscious blend of sharp cheddar, gooey mozzarella, and nutty Parmesan, all seasoned with garlic powder, onion powder, and a whisper of paprika. There’s something about that bubbling cheese peeking through a beautifully toasted breadcrumb blanket that instantly sparks joy—and maybe even a cheeky “Mmm!” as you dig in.
I still remember the first time I slid that bubbling casserole out of the oven for my family. My kitchen filled with the hum of contented sighs, and my niece insisted on licking the spoon before I could even plate it. It’s a recipe that begs for companionship—late-night chats over steaming spoons, lazy Sunday brunches with a crunchy side, or potluck gatherings where you just know everyone’s going to ask for seconds (and thirds). With its beginner-friendly steps and flexible add-ins—think crispy bacon bits or a touch of jalapeño heat—this Baked Mac and Cheese with a Crunch is guaranteed to become your go-to for satisfying both hungry bellies and homesick hearts.
KEY INGREDIENTS IN BAKED MAC AND CHEESE WITH A CRUNCH
Before you pop this beauty into the oven, let’s break down the star players that make every bite unforgettable. From the smooth foundation of rich dairy to the crispy breadcrumb crown, each ingredient brings its own magic.
- Elbow macaroni
A classic tubular pasta shape that holds onto sauce in its curves and hollows. It cooks up al dente, giving you that perfect bite-and-squat texture that’s impossible to resist.
- Unsalted butter
The backbone of your roux, melted gently to combine with flour. It brings richness to the sauce and helps thicken the milk into that silken cheese bath.
- All-purpose flour
Works hand-in-hand with butter to create a roux—the glue that thickens your milk and keeps your cheese sauce luxuriously smooth.
- Whole milk
Delivers creamy body and balances the sharpness of the cheeses. Heating it slowly ensures a lump-free sauce that clings lovingly to every noodle.
- Shredded sharp cheddar cheese
Packs robust flavor and vibrant orange color. It melts into the sauce, offering tangy depth and that familiar mac-and-cheese soul.
- Shredded mozzarella cheese
Known for its stretchy, melty texture, mozzarella blends seamlessly to create that irresistible, gooey pull with every forkful.
- Grated Parmesan cheese
Adds a hit of umami and a subtle nutty flavor. It elevates the sauce with its savory edge and helps with that final golden browning in the oven.
- Garlic powder
Infuses a gentle garlicky warmth without any chopping, enhancing the savory notes and layering in aromatic complexity.
- Onion powder
Rounds out the seasoning with a sweet, mellow onion undertone, working in harmony with garlic powder for balanced flavor.
- Paprika
Introduces a hint of smoky color and mild warmth, perfect for giving your sauce that little pep in its step.
- Salt and pepper
The unsung heroes that bring all the flavors into focus. Season to taste and adjust as you blend your cheeses into the sauce.
- Panko breadcrumbs
These Japanese-style crumbs toast up extra-crispy, delivering that signature crunch on top of your creamy casserole.
- Unsalted butter (melted)
Coats the panko for an even-toasting effect and golden hue, ensuring every crumb crisps to perfection.
- Chopped fresh parsley (optional)
A burst of fresh green color and a hint of herbaceous brightness that cuts through the richness at the end.
HOW TO MAKE BAKED MAC AND CHEESE WITH A CRUNCH
Let’s roll up our sleeves and transform these ingredients into a bubbling, crunchy masterpiece. Follow these detailed steps and you’ll have a comforting tray of perfection in no time.
1. Preheat your oven to 350°F (175°C). Setting the right temperature now ensures an even bake later, so you get that ideal golden crust without overcooking the pasta.
2. Cook the macaroni according to package instructions until it’s perfectly al dente—tender but still firm to the bite. Drain thoroughly and set aside in the colander, so the sauce clings better to every noodle.
3. In a large saucepan over medium heat, melt 4 tablespoons of unsalted butter until foaming. Sprinkle in the all-purpose flour and whisk constantly for about 1 minute, creating a smooth, bubbly roux that forms the base of your sauce.
4. Gradually pour in the whole milk while whisking continuously to prevent lumps. Keep stirring until the mixture thickens, about 5 minutes, resembling a smooth, velvety coat that clings to the back of your spoon.
5. Remove the saucepan from the heat and stir in shredded sharp cheddar, shredded mozzarella, and grated Parmesan cheese. Blend until completely melted and silky, giving you a sauce that begs to smother every noodle.
6. Season the cheese sauce with garlic powder, onion powder, paprika, salt, and pepper to taste. Mix well to distribute the spices evenly, creating layers of aromatic flavor in every mouthful.
7. Combine the drained macaroni with the cheese sauce in the saucepan or a large mixing bowl. Toss gently to ensure each piece of pasta is luxuriously coated in that creamy, tangy sauce.
8. Transfer the cheesy macaroni mixture to a greased baking dish, smoothing the top with a spatula for an even bake.
9. In a small bowl, mix the panko breadcrumbs with melted butter, coating each crumb so it toasts to a rich golden brown. Sprinkle this crunchy topping evenly over the macaroni and cheese.
10. Bake in the preheated oven for 25–30 minutes, or until the top is bubbling and the breadcrumbs are a deep golden brown, signaling that perfect crunch-to-cheese ratio.
11. Remove from the oven and let it cool for a few minutes before serving. Garnish with chopped fresh parsley if desired for a fresh pop of color and flavor.
SERVING SUGGESTIONS FOR BAKED MAC AND CHEESE WITH A CRUNCH
Bringing this Baked Mac and Cheese with a Crunch to the table is as much about presentation as it is about flavor. Whether you’re hosting a casual weeknight dinner or a festive gathering, these serving ideas will elevate your dish and make everyone feel pampered and satisfied. Think about contrasting textures, complementary flavors, and plating strategies that highlight that sultry cheese pull and irresistible crunch. It’s about creating a mealtime experience where each bite feels like a little celebration. From garnishes to pairings, these suggestions will have your guests applauding—or maybe just reaching for seconds.
- Serve in individual ramekins for a charming, personalized touch. Top each with freshly chopped parsley for color and place on small wooden boards to catch any stray crumbs.
- Pair with a crisp green salad tossed in a light vinaigrette to balance the richness of the cheese. Arugula or watercress with a lemon-Dijon dressing is a fresh contrast to every creamy bite.
- Accompany with barbecue favorites, like pulled pork or short ribs. The smoky meat flavors harmonize beautifully with the cheesy pasta, making it a true comfort-food feast.
- Transform leftovers into mac and cheese fritters: shape chilled portions into balls, dredge in flour and egg wash, then fry until golden. Serve with your favorite dipping sauce for an irresistible appetizer.
HOW TO STORE BAKED MAC AND CHEESE WITH A CRUNCH
Proper storage ensures you can enjoy this comfort classic long after the oven cools down. Whether you’re packing up leftovers for tomorrow’s lunch or stashing a batch in the freezer for a rainy day, following these tips will help maintain that creamy texture and crunchy topping (or at least get it back to near-original glory!). The key is to protect the sauce from drying out, keep the crumbs crisp, and reheat gently to preserve flavors. Let’s explore the best methods to store and reheat without sacrificing taste or texture.
- Refrigerate in an airtight container: After the dish cools to room temperature, transfer leftovers into a sealed container. This locks in moisture and flavor, keeping your mac and cheese fresh for up to four days.
- Cover the baking dish: If you plan to eat within two days, simply wrap the entire casserole dish* tightly with plastic wrap or foil. This avoids extra dishes and keeps the topping from getting too soggy.
- Freeze in individual portions: For longer storage, spoon cooled servings into freezer-safe containers or heavy-duty freezer bags. Separate layers with parchment paper to prevent sticking, and freeze for up to three months.
- Reheat gently: Thaw frozen portions overnight in the fridge. Warm in a 350°F oven for 15–20 minutes, uncovered, until heated through and the crumbs re-crisp. For refrigerated leftovers, microwave on medium power in short intervals, then bake for 5–10 minutes to restore that golden crunch.
CONCLUSION
This Baked Mac and Cheese with a Crunch recipe is your new secret weapon for cozy dinners, potlucks, and any time you need a hug in food form. We’ve walked through every stage: assembling simple pantry staples, crafting a velvety cheese sauce, layering in perfectly cooked macaroni, and crowning it with a buttery panko topping that toasts to golden perfection. Along the way, we explored how each ingredient contributes to the final dish—from the tangy sharp cheddar that brightens the sauce to the crisp breadcrumbs that provide that irresistible contrast. Serving suggestions help you transform this into an upscale side or a show-stopping main, while storage tips guarantee you can enjoy it again and again without losing a hint of that original magic. Whether you’re feeding a crowd or savoring those leftover bites solo, this recipe is a versatile, crowd-pleasing champion in your culinary arsenal.
Feel free to print this article and save it in your favorite recipe binder so it’s ready whenever you crave cheesy comfort with a crunchy twist. You’ll also find a FAQ below to answer any extra questions you might have about substitutions, reheating methods, or creative add-ins. If you give this Baked Mac and Cheese with a Crunch a whirl—or put your own spin on it—let me know how it turned out! Drop a comment, share your tips, or ask anything you need help with. I’m always thrilled to hear from fellow home cooks, swap stories, and troubleshoot any cheese sauce hiccups together. Happy baking (and crunching)!
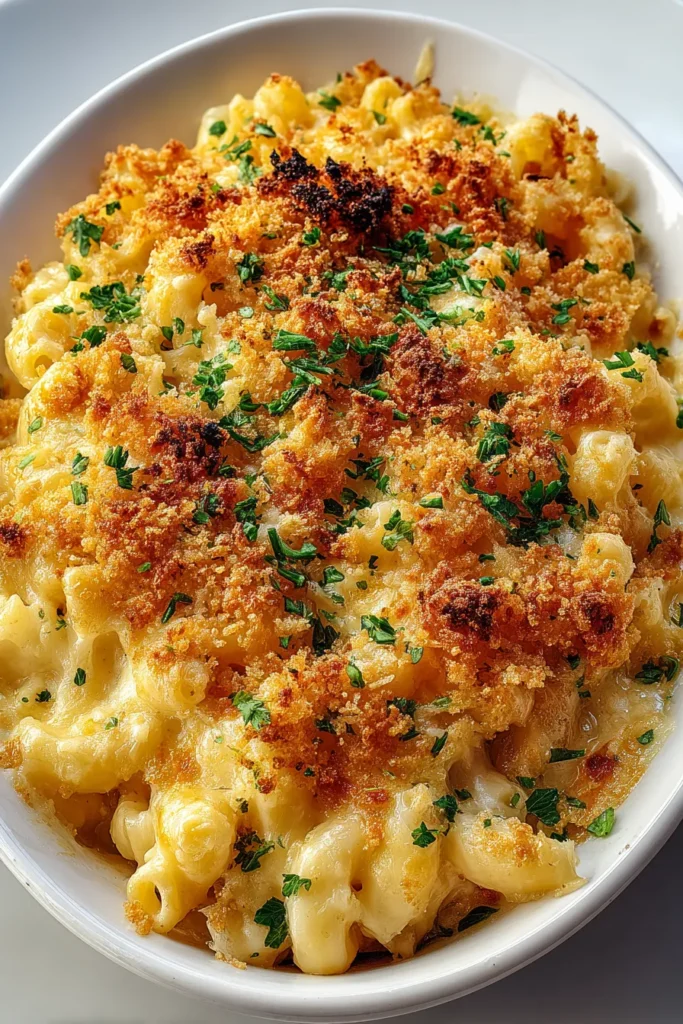

Baked Mac and Cheese with a Crunch
Description
This Baked Mac and Cheese features a luscious cheese sauce enveloping al dente pasta, all crowned with a crispy panko topping that adds irresistible crunch to every creamy bite.
Ingredients
Instructions
-
Preheat your oven to 350°F (175°C).
-
Cook the macaroni according to the package instructions until al dente. Drain and set aside.
-
In a large saucepan, melt 4 tablespoons of butter over medium heat. Add the flour and whisk constantly for about 1 minute until smooth and bubbly.
-
Gradually pour in the milk, whisking continuously to avoid lumps. Cook until the mixture starts to thicken, about 5 minutes.
-
Remove the saucepan from the heat and stir in the cheddar, mozzarella, and Parmesan cheese until completely melted and smooth.
-
Add garlic powder, onion powder, paprika, salt, and pepper to taste. Mix well.
-
Combine the macaroni with the cheese sauce, ensuring every piece is well coated.
-
Transfer the mixture to a greased baking dish.
-
In a small bowl, mix the panko breadcrumbs with the melted butter. Sprinkle evenly over the macaroni and cheese.
-
Bake in the preheated oven for 25-30 minutes, or until the top is golden brown and crispy.
-
Remove from the oven and allow it to cool for a few minutes before serving. Garnish with fresh parsley if desired.
Note
- Using a mix of cheeses gives a richer flavor; feel free to explore with other varieties like Gruyere or Gouda.
- For extra crunch, consider adding crushed cornflakes to the breadcrumb topping.
- This dish can be prepared ahead of time and baked just before serving, making it ideal for gatherings.
- Add cooked bacon bits or diced jalapenos for an exciting twist.

