

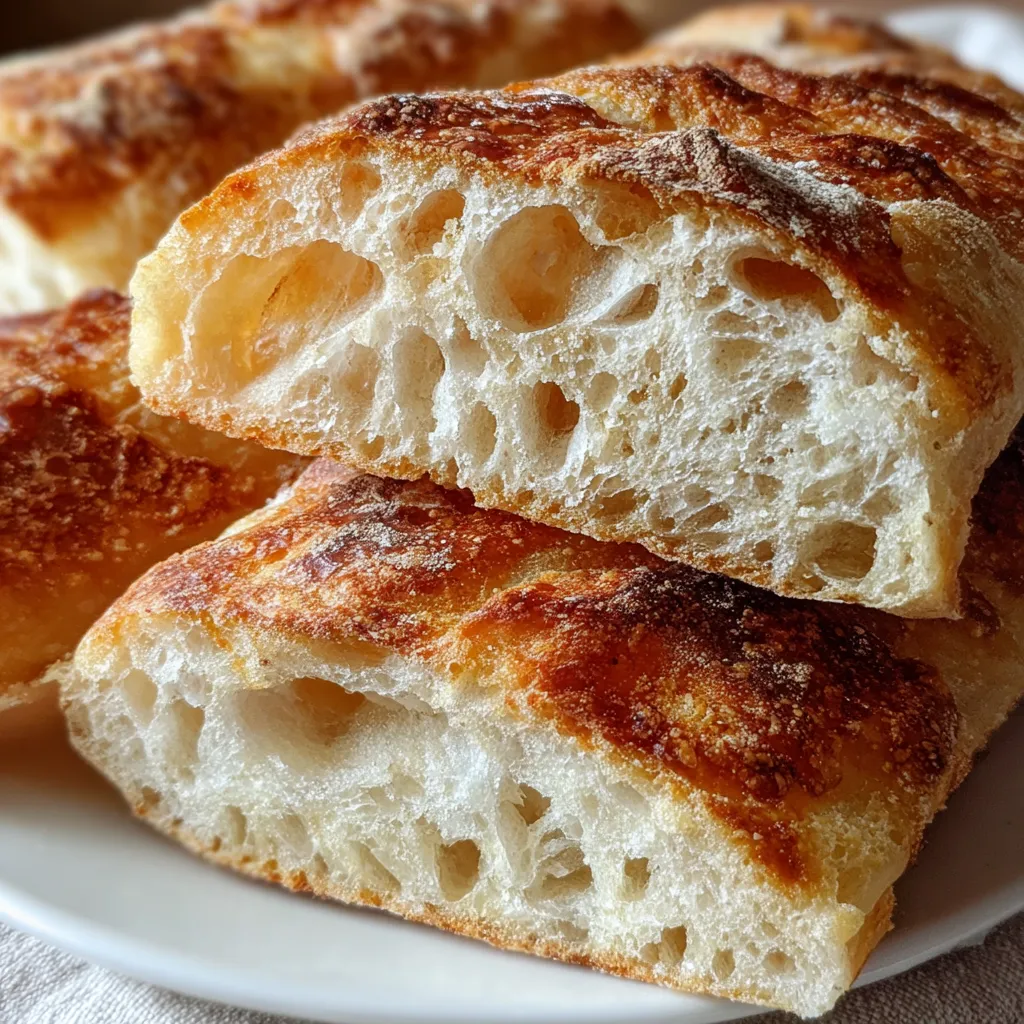
Get ready to bake a rustic loaf that cracks open to reveal a pillowy, open crumb beneath a golden, crackly crust—all with no kneading! With just flour, water, yeast, salt, and a splash of olive oil, this no-knead ciabatta brings artisan flair to your kitchen. The long, gentle fermentation creates a network of airy tunnels, and a final olive oil kiss adds extra crispness. Dive in to learn how simple it can be!
Key Ingredients
Before we dive into the slow magic of fermentation, let’s gather our few simple ingredients that turn into a rustic loaf with a bronzed, airy interior and a mouthwatering crust.
- 3 cups all-purpose flour (plus extra for dusting): Provides the structure and body of the ciabatta.
- 1 1/4 cups lukewarm water (around 100°F or 37°C): Activates the yeast and hydrates the flour for an open crumb.
- 1 teaspoon instant yeast: Leavens the dough for rise and airy texture.
- 1 1/2 teaspoons salt: Enhances flavor and strengthens gluten structure.
- Olive oil: Greases surfaces to prevent sticking and adds flavor to the crust.
How To Make Artisan No-Knead Ciabatta with Crunchy Crust and Airy Texture
Now that we’ve assembled our essentials, let’s walk through each step—from mixing a shaggy dough to coaxing out delicate air pockets—to transform these humble ingredients into an artisan masterpiece. You’ll learn how to ferment slowly, shape gently, and bake with steam to achieve that signature crunchy crust and open, airy crumb. Follow along below for a detailed, step-by-step guide that walks you through the entire no-knead process, ensuring your ciabatta comes out golden brown every time.
1. In a large mixing bowl, combine the flour and salt, mixing well to evenly distribute the ingredients and create a uniform base.
2. In a separate bowl, mix the lukewarm water and instant yeast until the yeast is fully dissolved, then let it rest for about 5 minutes to proof and activate.
3. Pour the yeast mixture into the flour mixture and stir with a wooden spoon or spatula until a lumpy dough forms—don’t worry about smoothness, overmixing can deflate those future air pockets.
4. Cover the bowl with plastic wrap or a damp kitchen towel, and let it rest at room temperature for 12 to 18 hours to allow a long bulk fermentation that builds flavor and structure.
5. After resting, the dough should be bubbly and noticeably risen. Generously dust your work surface with flour and carefully turn the dough out onto it.
6. With floured hands, gently stretch the dough into a rectangle, being careful not to deflate it. Folding it in thirds like a letter adds strength and improves oven spring.
7. Once folded, cover with a floured kitchen towel and let the dough rise for another 30 minutes to develop a bit more lift.
8. Meanwhile, place a baking stone or an inverted baking sheet in the oven and preheat to 450°F (232°C). If you have a Dutch oven, preheat that as well to trap extra steam.
9. When the oven’s ready, transfer the dough onto a piece of parchment paper using a bench scraper to keep its shape intact.
10. If using a Dutch oven, remove it from the oven, place the parchment with the dough inside (without the lid), or slide the parchment onto the preheated baking stone or sheet.
11. Drizzle a little olive oil on top of the dough for extra flavor and crispness.
12. Bake for 25–30 minutes, covering the Dutch oven for the first 20 minutes if using, then uncovering for the remainder. Look for a deep golden-brown crust and a hollow sound when tapped.
13. Remove the loaf from the oven and let it cool on a wire rack for at least 30 minutes before slicing to allow the crumb to set properly.
Serving Suggestions
This ciabatta’s crackly exterior and soft interior make it a showstopper in any meal. Whether you’re layering it for sandwiches at brunch or pairing warm slices with olive oil for dipping, this loaf elevates the simplest bites. It’s perfect for sharing at breakfast tables or as a rustic backdrop to soups and salads. Here are four easy ways to serve your fresh ciabatta that’ll impress family and friends and highlight its airy crumb and crunchy crust.
- Classic olive oil dip: Drizzle high-quality olive oil onto small plates, add a pinch of sea salt and herbes de Provence, then tear chunks of warm ciabatta for dipping.
- Bruschetta style: Toast slices until golden, rub with garlic, top with diced tomatoes, basil, and a splash of balsamic vinegar for a bright appetizer.
- Hearty sandwich base: Slice lengthwise and fill with grilled vegetables, sliced meats, or cheese for a satisfying midday meal.
- Soup companion: Serve thick-cut slices alongside creamy soups like tomato basil or minestrone to soak up every flavorful drop.
Tips For Perfect Artisan No-Knead Ciabatta with Crunchy Crust and Airy Texture
For the crispiest crust and lightest crumb, a few insider tweaks can make all the difference. Patience during the long fermentation, gentle handling to preserve those precious air pockets, and embracing variations will take your no-knead ciabatta from great to unforgettable. Whether you’re a weekend warrior or an everyday baker, these focused tips will help you navigate each stage—from mixing to cooling—to ensure your loaf emerges bronzed, airy, and ready to impress every time.
- The longer fermentation time improves the flavor and texture significantly.
- Always handle the dough gently to preserve the air bubbles created during fermentation.
- Feel free to experiment with add-ins like herbs, olives, or sun-dried tomatoes for unique versions of ciabatta.
- Storing the bread in a paper bag at room temperature keeps the crust crispy.
- This recipe can be doubled if you want to make more bread to share or freeze.
How To Store It
Once your ciabatta has cooled, proper storage is key to maintaining that delightful crunch and tender crumb. Whether you plan to enjoy your loaf over the next few days or freeze leftovers for later, these storage methods will help preserve the crusty exterior and prevent staling. Follow these simple tips to keep each slice tasting freshly baked.
- Store at room temperature in a paper bag or loosely wrapped in a clean kitchen towel to allow airflow and maintain the crunchy crust.
- For longer storage, slice the loaf, place slices in an airtight freezer bag, and freeze; pull out individual slices as needed.
- To revive stale or frozen bread, reheat in a 350°F (175°C) oven for 5 to 10 minutes until crisp.
- Avoid using plastic wrap for room-temp storage, as it traps moisture and softens the crust.
Frequently Asked Questions
Got questions? Here are some quick answers to common no-knead ciabatta queries.
- How long does the fermentation step take and why is it so long?
The dough needs to rest for 12 to 18 hours at room temperature to allow slow enzyme activity and yeast fermentation to develop flavor, strength, and those signature bubbles. This extended time builds complex taste and an open crumb without any heavy kneading.
- My dough is extremely sticky—how can I handle it without deflating all the air bubbles?
Dust both your hands and work surface generously with flour and use a bench scraper to gently lift and fold the dough. Avoid adding too much extra flour at once; sprinkle lightly between folds. Wetting your hands can help prevent sticking without compressing the dough’s structure.
- Can I substitute active dry yeast for the instant yeast called for in the recipe?
Yes. If you only have active dry yeast, dissolve it first in the lukewarm water with a pinch of sugar and let it proof for 5 to 10 minutes until bubbly. Then proceed as directed, keeping the same rise times since the overall fermentation and flavor development remain crucial.
- What techniques ensure a crunchy crust on this ciabatta?
Preheat a baking stone or inverted sheet at 450°F (232°C) to deliver intense heat from below. Adding steam by using a preheated Dutch oven or by placing a shallow pan of hot water on the oven floor in the first 10 to 15 minutes of baking traps moisture, which then transforms into crisp crust as the steam dissipates.
- When and why should I let the loaf cool before slicing?
Allowing the bread to cool on a wire rack for at least 30 minutes is essential so the interior crumb sets and excess moisture redistributes, preventing a gummy texture. Cutting too soon will distort the airy structure you worked to create.
- Can I incorporate additions like olives, herbs, or cheese?
Absolutely. After the dough’s first bulk rest, gently spread it into a rectangle, scatter your mix-ins evenly, and fold as instructed. Keep the total hydration in mind—moist ingredients like olives may warrant an extra dusting of flour to maintain dough consistency.
- What’s the best way to store leftover ciabatta to keep the crust crispy?
Store at room temperature in a paper bag or loosely wrapped in a kitchen towel. Plastic will trap moisture and soften the crust. For longer storage, slice and freeze in airtight bags; reheat in a 350°F (175°C) oven for 5 to 10 minutes to revive crispness.
- How can I double this recipe to bake more loaves at once?
Simply scale all ingredients twofold and use a larger vessel for fermentation. Keep rise times and temperatures identical. You may need to handle the dough in batches or divide it after bulk fermentation to ensure each loaf bakes with proper heat circulation.
What Makes This Special
There’s something magical about a loaf that demands no arduous kneading yet rewards you with a crackly golden crust, pillow-soft interior, and aromatic complexity you’d expect from an artisan bakery. This recipe works because it harnesses the power of time and simple ingredients, trusting slow fermentation to build flavor and structure while you go about your day. It’s forgiving, versatile, and invites playful tweaks—herbs, olives, or sun-dried tomatoes all welcome. Feel free to print and tuck this recipe into your favorite binder, then share your baking triumphs (or questions!) in the comments below—nothing beats the joy of fresh ciabatta straight from the oven.

Artisan No-Knead Ciabatta with Crunchy Crust and Airy Texture
Description
Crack through the bronzed crust to reveal a network of light, airy tunnels and breathe in the warm, yeasty fragrance. A drizzle of olive oil gilds each bite, marrying crispiness with a soft, pillowy center.
Ingredients
Instructions
-
In a large mixing bowl, combine the flour and salt, mixing well to evenly distribute the ingredients.
-
In a separate bowl, mix the lukewarm water and instant yeast until the yeast is dissolved. Let this mixture sit for about 5 minutes.
-
Pour the yeast mixture into the flour mixture and stir with a wooden spoon or spatula until it forms a lumpy dough. Don’t worry about the lumps; the key here is not to overmix.
-
Cover the bowl with plastic wrap or a damp kitchen towel, and let it rest at room temperature for 12 to 18 hours. This long fermentation time allows for the development of flavor and texture.
-
After the resting time, the dough should be bubbly and have risen significantly. Generously dust your work surface with flour and carefully turn the dough out onto it.
-
With floured hands, gently stretch the dough into a rectangle, being careful not to deflate it too much. Folding it over itself in thirds like a letter can help build structure.
-
Once folded, cover it with a floured kitchen towel and let it rise for another 30 minutes.
-
Meanwhile, place a baking stone or an inverted baking sheet in the oven and preheat to 450°F (232°C). If you have a Dutch oven, you can preheat that as well for extra steam.
-
Once the oven is ready, carefully transfer the dough onto a piece of parchment paper for easy transport. You can use a bench scraper to aid this process.
-
If using a Dutch oven, remove it from the oven and place the parchment with the dough inside (without the lid), or simply slide the parchment onto the baking stone or sheet.
-
If desired, you can drizzle a little olive oil on the top of the dough for added flavor and crispness.
-
Bake for about 25-30 minutes or until the loaf is golden brown and has a hollow sound when tapped. If using a Dutch oven, cover it for the first 20 minutes, then uncover it for the remaining time.
-
Once baked, remove it from the oven and let it cool on a wire rack for at least 30 minutes before slicing. This allows the crumb to set properly.
Note
- The longer fermentation time improves the flavor and texture significantly.
- Always handle the dough gently to preserve the air bubbles created during fermentation.
- Feel free to experiment with add-ins like herbs, olives, or sun-dried tomatoes for unique versions of ciabatta.
- Storing the bread in a paper bag at room temperature keeps the crust crispy.
- This recipe can be doubled if you want to make more bread to share or freeze.

